Cluster Deployment
Establish a system blueprint in advance, weigh various technologies and implementation methods, carefully design, rationally utilize various resources, and ultimately determine a detailed deployment plan for the new system to provide deployment reference for deployment personnel.
Component List
| Component | Description | Requirements | Mandatory |
|---|---|---|---|
| Server | Server hardware | Minimum configuration: 4-core CPU, 16G memory (recommended: 8-core CPU, 32G memory), system disk, data disk, dedicated disk for Minio | Yes |
| Operating System | Operating system | Centos/RedHat 7.9 | Yes |
| nginx | Reverse proxy, load balancing | Nginx 1.10+ | Yes |
| redis | Data cache | Redis 5.0+ | Yes |
| postgresql | Database | PostgreSQL 13.5+ | Yes |
| rabbitMQ | Message queue | RabbitMQ 3.9.16 | Yes |
| onlyoffice | Office document preview and editing | 7.1+ | Yes |
| minio | File shared storage | 2022-09-01+ | Yes |
| elastic-search | Full-text search, search engine | 7.0+ | Yes |
| informat-account | Low-code account service | None | Yes |
| informat-biz | Low-code application service | None | Yes |
| pgpool | 4.3.8+ | PostgreSQL cluster middleware | Yes |
Resource Allocation
- Deploy all components on 3 servers, use Nginx for load balancing
- Minio cluster, use Nginx for load balancing
- Apply for elastic IP for PostgreSQL database service, open firewall port 9999
- Redis cluster, open firewall ports 6381, 6382
- ES, RabbitMQ, OnlyOffice use single-node services, access via virtual IP
Note
Cluster deployment requires at least 3 service nodes. All components must be installed on all 3 nodes, and each service node needs an independent disk as the data directory for Minio object storage service.
Server Resource Allocation
| Machine | Configuration | Deployment | Remarks |
|---|---|---|---|
| Node1 | 8C/32G/50G system disk/500G data disk/100G Minio data disk | All components | Database master node, example IP: 10.0.1.101 |
| Node2 | 8C/32G/50G system disk/500G data disk/100G Minio data disk | All components | Database slave node, example IP: 10.0.1.102 |
| Node3 | 8C/32G/50G system disk/500G data disk/100G Minio data disk | All components | Database slave node, example IP: 10.0.1.103 |
| VIP | Virtual IP for node drift | - | Example IP: 10.0.1.100 |
External Service Ports
| Port Number | Description |
|---|---|
| 80 | Informat service port (mandatory) |
| 9002 | File preview service port (mandatory) |
| 19001 | Minio console port (optional) |
| 15672 | RabbitMQ console port (optional) |
| 9999 | Database port (optional) |
Deployment Architecture
Redis
Deploy a Redis cluster with three masters and three slaves for cross-replication to ensure high availability. 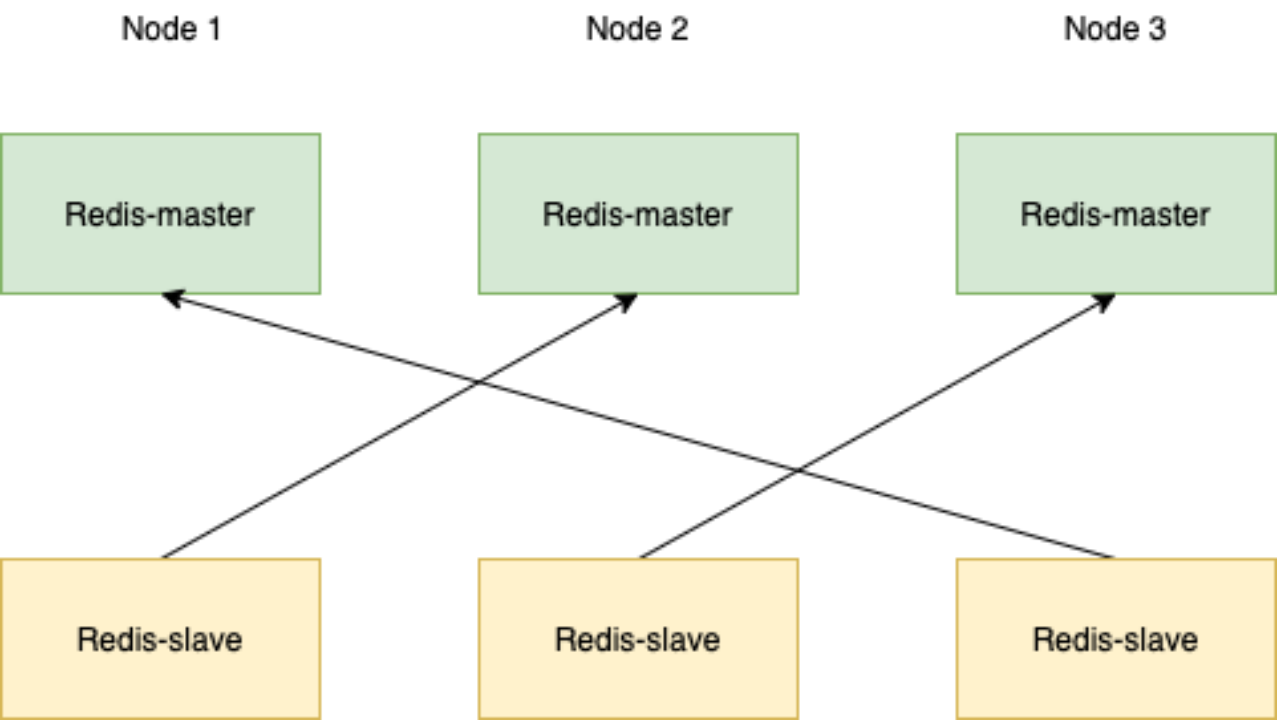
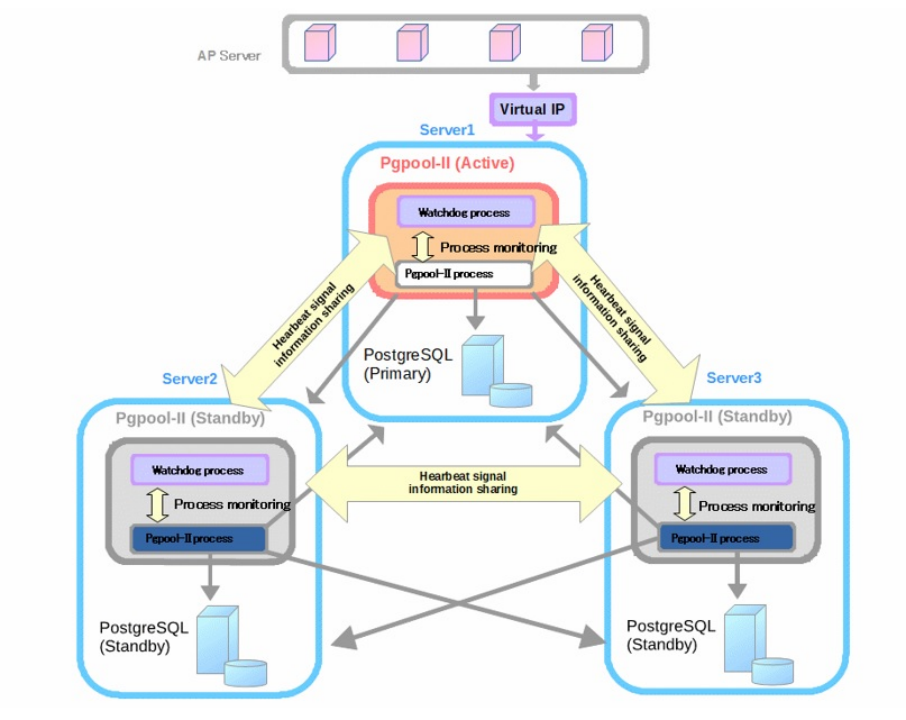
PostgreSQL (One Master with Multiple Slaves + pgpool)
Pgpool acts as a proxy between the application and the database. It is responsible for connection pool management, database load balancing, and automatic failover. Pgpool monitors the status of the master database. If the master database fails, it will select a healthy slave database to upgrade to the new master database.
Deployment Process
Parameter Variable Description
In all bash commands below, variables should be replaced with actual deployment environment content:
{node1}: Node 1 IP address {node2}: Node 2 IP address {node3}: Node 3 IP address {VIP}: Virtual IP {device}: Minio disk device, e.g., /dev/sdb
Here's an example demonstrating how to replace:
Node 1 IP address: 10.0.1.101 Node 2 IP address: 10.0.1.102 Node 3 IP address: 10.0.1.103
# Script example
/cluster-tools/sshUserSetup.sh -user root -hosts "{node1} {node2} {node3}" -advanced
# Actual script after replacement
/cluster-tools/sshUserSetup.sh -user root -hosts "10.0.1.101 10.0.1.102 10.0.1.103" -advancedInstaller Command Line Installation
Each node should first be deployed according to the single-node deployment method using the installer command line installation. For detailed content, refer to Installer Command Line Installation
Note
Please do not change the installation directory, password, and other parameters, as this may affect the subsequent script execution.
Upload Cluster Tool Scripts
Upload the cluster-tools.zip file to the root directory of all server nodes, extract the zip package, and assign permissions to the scripts.
Note
If using Ubuntu system, please download cluster-tools-ubuntu.zip and run it using root account.
unzip cluster-tools.zip
cd cluster-tools
chmod +x ./*.sh
chmod +x ./**/*.shEstablish SSH Mutual Trust
# Create mutual trust for ROOT user, enter the ROOT account password for each server. When creating ssh key, do not enter a passphrase for passphrase, just press Enter.
./sshUserSetup.sh -user root -hosts "{node1} {node2} {node3}" -advancedRedis Cluster Configuration
Run the Redis cluster initialization service on all nodes:
./redis-cluster-tools/init.sh

# Check if redis cluster service is normal
systemctl status redis-clusterRun the create cluster command on any node:
/usr/local/redis/bin/redis-cli --cluster create --cluster-replicas 1 {node1}:6381 {node1}:6382 {node2}:6381 {node2}:6382 {node3}:6381 {node3}:6382Redis Cluster Service Verification
# Set redis key
/usr/local/redis/bin/redis-cli -c -h {node1} -p 6381
set test "hello"
exit

# Return redis stored value, check if it can be obtained normally or consistently
/usr/local/redis/bin/redis-cli -c -h {node2} -p 6381
get test
exitMinio Cluster Configuration
Run the following commands on all server nodes:
# View disk situation
lsblk
# View partition situation
fdisk -l
# Minio cluster requires a separate disk as minio data directory, initialize minio disk, run the following command
./minio-cluster/init.sh -d {device} -n {node1} -n {node2} -n {node3}Minio Service Verification
Log in to any node console at http://{node1}:19001
Username: admin Password: admin123455202221001
Initialization work: Create bucket informat-next
Service verification: Upload files and log in to other nodes to check if they are synchronized normally
PostgreSQL Cluster
Execute on all nodes to initialize services:
./postgresql-tools/init.shRun on any node:
# Create mutual trust for postgres user, enter the Postgres password for each server (default is Informat-Next_#,.20221001). When creating ssh key, do not enter a passphrase for passphrase, just press Enter.
su - postgres
cd /cluster-tools
./sshUserSetup.sh -user postgres -hosts "{node1} {node2} {node3}" -advanced
exitNote
Since pgpool involves VIP drift, network card operations are required. The ./postgresql-tools/install.sh script contains network test scripts, which default to using the eth0 network card. If the network card name is inconsistent, please manually modify the relevant script content before executing the command.
For example, the relevant parameters in pgpool.conf:
if_up_cmd = '/usr/bin/sudo /sbin/ip addr add $_IP_$/24 dev eth0 label eth0:1'
if_down_cmd = '/usr/bin/sudo /sbin/ip addr del $_IP_$/24 dev eth0'
arping_cmd = '/usr/bin/sudo /usr/sbin/arping -U $_IP_$ -w 1 -I eth0'After completing mutual trust establishment, execute the following command:
./postgresql-tools/install.sh -v {VIP} -n {node1} -n {node2} -n {node3}

# Check cluster node status
psql -d postgres -U pgpool -h 127.0.0.1 -p 9999 -c "show pool_nodes"

# All nodes should have status=up and pg_status=up, indicating the service is normal

node_id |   hostname    | port | status | pg_status | lb_weight |  role   | pg_role | select_cnt | load_balance_node | replication_delay | replication_state | replication_sync_state |
last_status_change
---------+---------------+------+--------+-----------+-----------+---------+---------+------------+-------------------+-------------------+-------------------+------------------------+-
--------------------
 0       | 192.168.1.110 | 5432 | up     | up        | 0.333333  | primary | primary | 44393      | false             | 0                 |                   |                        |
2024-09-24 23:21:44
 1       | 192.168.1.111 | 5432 | up     | up        | 0.333333  | standby | standby | 66646      | true              | 0                 |                   |                        |
2024-09-24 23:21:44
 2       | 192.168.1.112 | 5432 | up     | up        | 0.333333  | standby | standby | 69299      | false             | 0                 |                   |                        |
2024-09-24 23:21:44
(3 rows)Other Commands
# Check pgpool service status
systemctl status pgpool
# Add cluster node with node_id 0 (corresponding to node1)
pcp_attach_node -h 127.0.0.1 -U pgpool -n 0
# Promote node with node_id 0 to primary node
pcp_promote_node -h 127.0.0.1 -U pgpool -n 0
# Restore node with node_id 1 to slave node
pcp_recovery_node -U pgpool -h 127.0.0.1 -n 1# Manually create standby database. If the install script does not complete standby database creation, please execute manually
cp -rf /data/pgsql/data/ /data/pgsql/data_bak/
rm -rf /data/pgsql/data/*
pg_basebackup -h {node1} -p 5432 -U postgres -D /data/pgsql/data/ -P -Xs -R
chown -R postgres:postgres /data/pgsql/data/
chmod 700 /data/pgsql/data/Common Issues
# Error when running psql -d postgres -U pgpool -h 127.0.0.1 -p 9999 -c "show pool_nodes"
psql: error: ERROR:  failed to authenticate with backend using SCRAM
DETAIL:  valid password not found
# Run the following commands on the primary node to reset passwords, PostgreSQL will automatically adjust passwords to MD5 encryption
psql -U postgres -p 5432 -h 127.0.0.1 -c "alter user postgres with encrypted password 'Informat-Next_#,.20221001';"
psql -U postgres -p 5432 -h 127.0.0.1 -c "alter user pgpool with encrypted password 'Informat-Next_#,.20221001';"Nginx Configuration
Run the initialization command on any node:
./nginx/install.sh -v {VIP} -n {node1} -n {node2} -n {node3}

# Check if service is normal
systemctl status nginxInformat Configuration
Run the initialization command on any node:
./informat/install.sh -v {VIP} -n {node1} -n {node2} -n {node3}

# Check if Account service is normal
systemctl status informat-account
# Check if Biz service is normal
systemctl status informat-bizAccess the System
Enter the address in the browser address bar: http://{VIP} to access