Chapter 4: Workflow
After completing the Quick Start, your "Employee Information Management System" has been able to "store" (data tables) and "display" (views) data very well. But imagine, if an employee wants to apply for annual leave, what would he/she need to do?
- Employee: Fill out a leave application form manually or electronically.
- Employee: Send an email to the department supervisor with the leave application form attached.
- Supervisor: Receive the email, review the leave application, and reply with "approved" or "rejected".
- Supervisor/Employee: Forward the email to HR so HR can enter it into the system.
- HR: Manually record or update the employee's leave status and remaining leave in the system (the [Employee Table] you built).
The entire process is full of manual intervention, information silos (inconsistent data between emails and systems), and waiting time. Once the process becomes complex, such as requiring "director approval" or "financial accounting", the difficulty and error rate of manual operation will increase exponentially.
Workflow is a set of "automated engines and intelligent conveyor belts" provided by Informat Low-Code Platform. Its mission is:
- Set a roadmap: You only need to design every step of the business in a graphical way (like drawing a flow chart).
- Automatic data flow: When employees submit applications, data is no longer static records, but becomes a living "ticket" that automatically flows along the route you set, from the initiator to the supervisor, and then to HR.
- Automatic system processing: During the flow process, the system will automatically update status, automatically calculate duration, automatically send notifications, and even automatically call interfaces of external systems.
Through the study of this chapter, you will completely bid farewell to the inefficient management methods that rely on emails and manual records.
4.1 Core Concept of Workflow: Draw Your Business Map with BPMN
Informat's workflow module integrates the international standard BPMN 2.0 (BPMN 2.0) specification. This may sound a bit profound, but please imagine it as a set of unified "business process traffic signs". You only need to recognize these signs to draw flowcharts.
| BPMN Element | Graphic Mark | Role in Informat | Analogy in Life |
|---|---|---|---|
| Events | Circle | The starting point, ending point, or waiting point in the process. | Traffic lights: When encountering it, the process either starts, ends, or waits for a certain condition (such as time or message). |
| User Task | Square with human icon | Nodes that require manual processing and decision-making. Such as "supervisor approval" and "fill out quality inspection report". | Manual counter: Need to queue up for manual processing. |
| Service Task | Square with gear icon | Tasks automatically completed by the system without manual intervention. For example, "send email notification" and "call external API". | Vending machine: Automatically executed by the machine, completed instantly, no manual required. |
| Gateways | Diamond | Used to judge conditions and control the branching, merging, and decision-making of processes. | Crossroads/fork roads: Guide data to flow in different directions according to set rules. |
| Sequence Flow | Solid line with arrow | Lines connecting all elements, defining the execution order of the process. | Route guidance arrow: Direction of data flow. |
4.2 Practical Preparation: Create a [Leave Application Form] Data Container
Before starting to draw the flow chart, we must first prepare a table that "carries data" for the process. This table will record all the details of the leave application and become the "data center" for all operations in the process.
- Create a data table: In the application designer, add a new [Data Table] module and name it [Leave Application Form].
- Design key fields: We need to add the following fields, and pay special attention to their design ideas.
| Field Name | Field Type | Purpose and Design Ideas | Core Configuration Points |
|---|---|---|---|
| Applicant | Creator | Record who initiated the application. | No manual filling required, the system automatically records the applicant |
| Leave Type | List Selection | Standardize leave reasons (annual leave, sick leave, personal leave). | Required field |
| Start Time/End Time | Date and Time | Record the precise time period of leave. | Required fields to ensure data integrity. |
| Leave Duration (days) | Function Field | Automatically calculate the difference between start and end time (i.e., leave days) to avoid manual calculation errors. | Not stored in database, dynamically calculate results at runtime. |
| Current Status | List Selection | Record the current progress of the process. The process automation steps will automatically update this field. | Optional values: Pending approval, Supervisor approved, HR approved, Approved, Rejected. |
| Leave Reason | Multi-line Text | Employees provide detailed explanation of leave reasons. | Allow not filling. |
🛠️ Field Details: The Magic of Function Fields
Traditional tables require manual calculation of duration, which is error-prone. But in Informat, you only need to select a Function field and configure a simple function expression. For example, use the
DATEDIFF()function to automatically calculate the number of days between two dates. Remember, function fields are not stored in the database, and results are dynamically calculated at runtime.
Finally, we get the following fields:
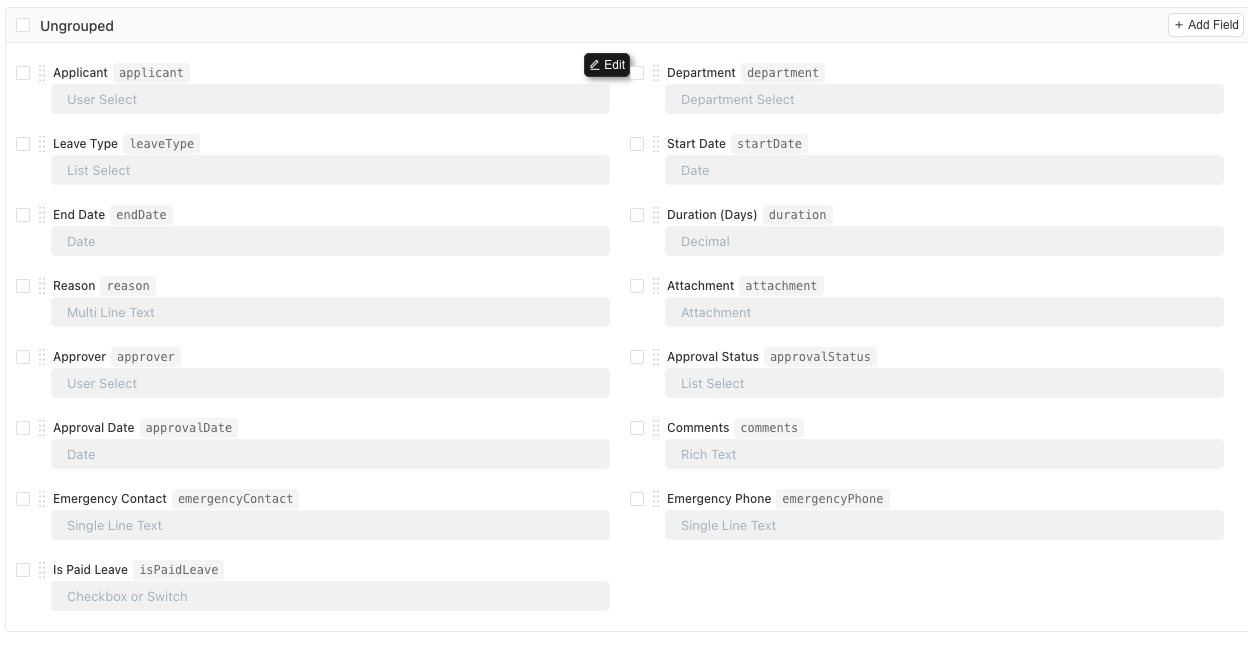
4.3 Process Initiation and Drawing: Build the Skeleton of Approval Process
Now that we have the "ingredients" (data table), let's start designing the "recipe" (process).
4.3.1 Create Workflow
- Create a workflow module: In the application designer, click "Create Module", select [Workflow] type, and name it [Workflow].
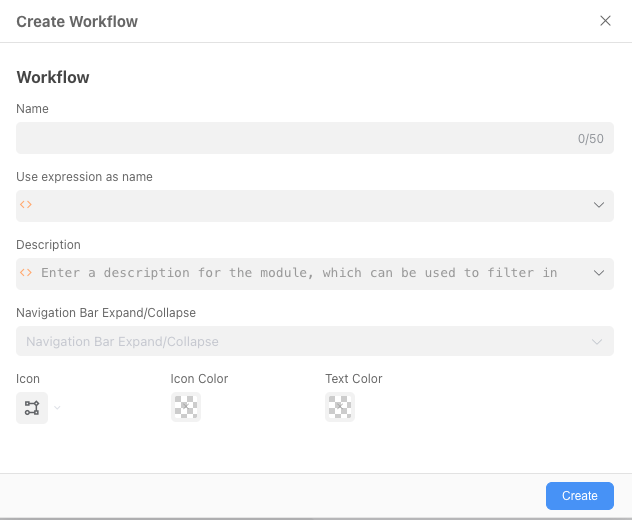
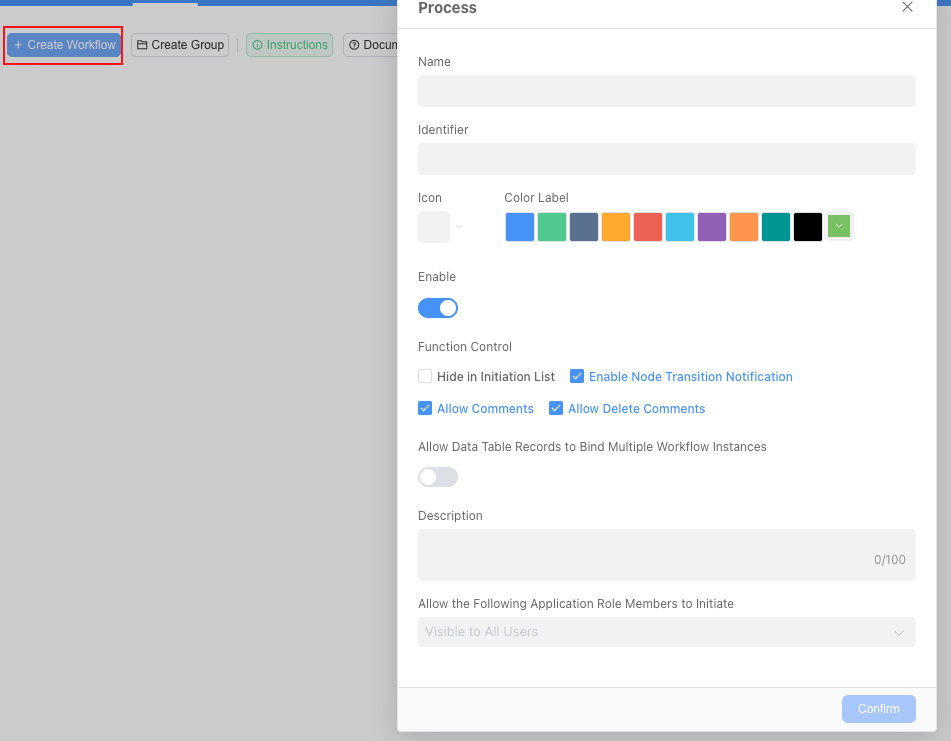
Click the "Create Workflow" button to create an employee leave workflow.
4.3.2 Approval Process Global Settings
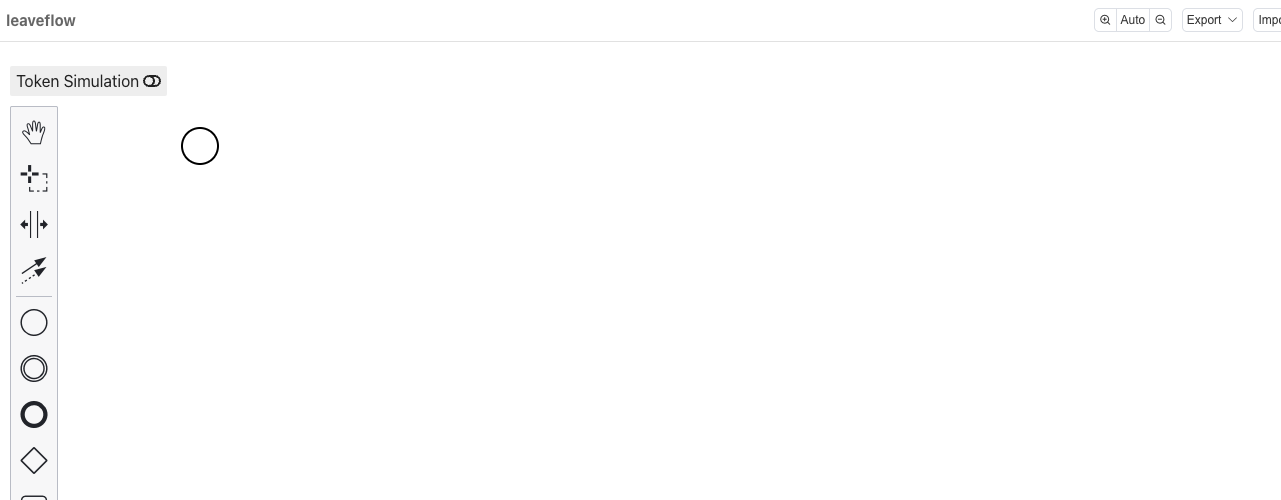
We will take a classic process as an example to draw a leave application flowchart: "Leave within 3 days only requires supervisor approval, leave exceeding 3 days requires HR specialist approval, and rejected applications can be modified". After clicking the "Set Flowchart" button, you will see the following page:
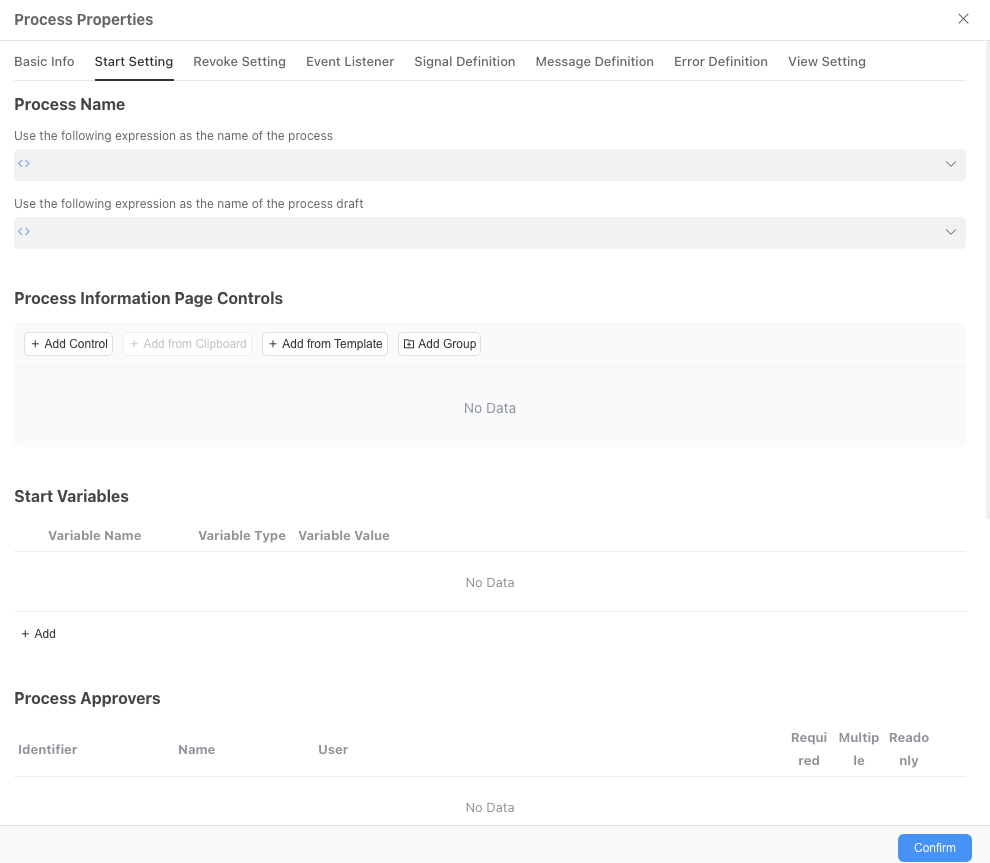
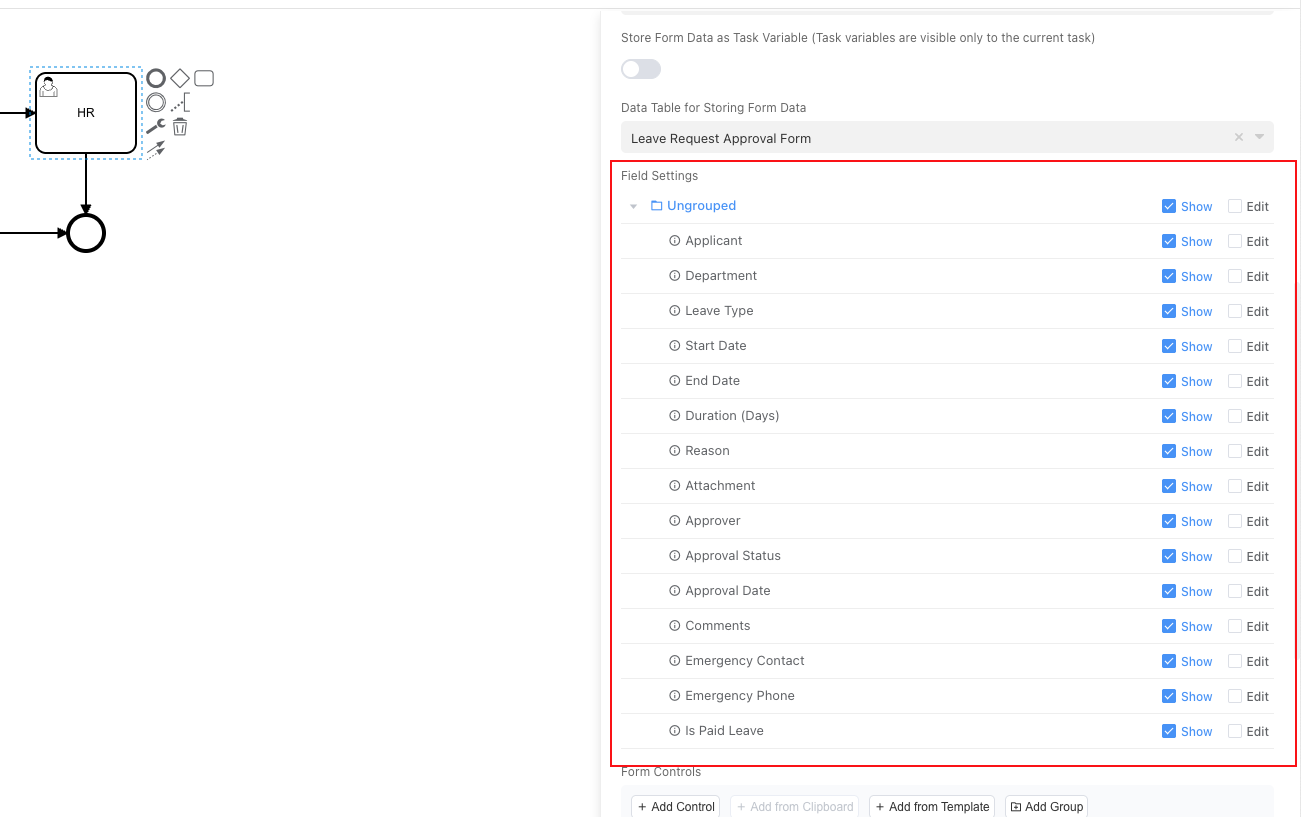
Click the "Global Settings" button, switch to the "Initiation Settings" tab, check "Fill out form before starting process", select the [Leave Application Form] created in the previous step for the data table storing the form. In the field settings, we select which fields can be seen and which can be edited when initiating the leave application according to needs. Click "Save" after completing the settings.
4.3.3 Draw Flowchart
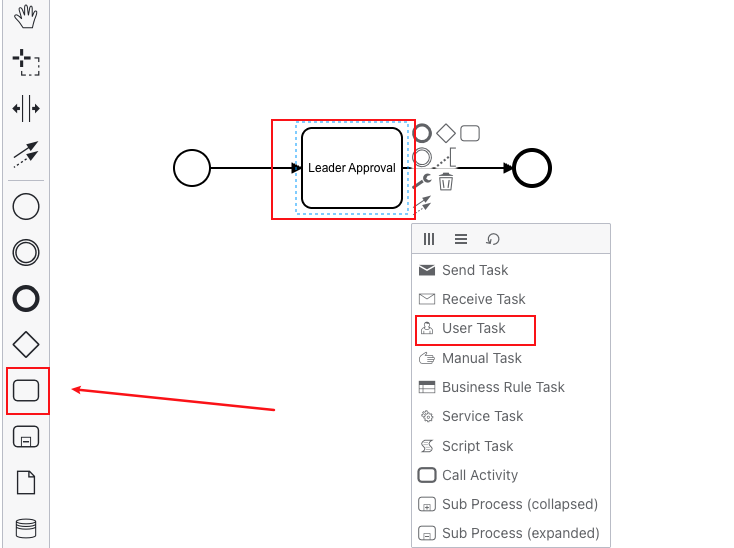
User Task: Department Supervisor Approval Drag a rectangle from the left toolbar to the page, set it as "User Task", and name it "Department Supervisor Approval".
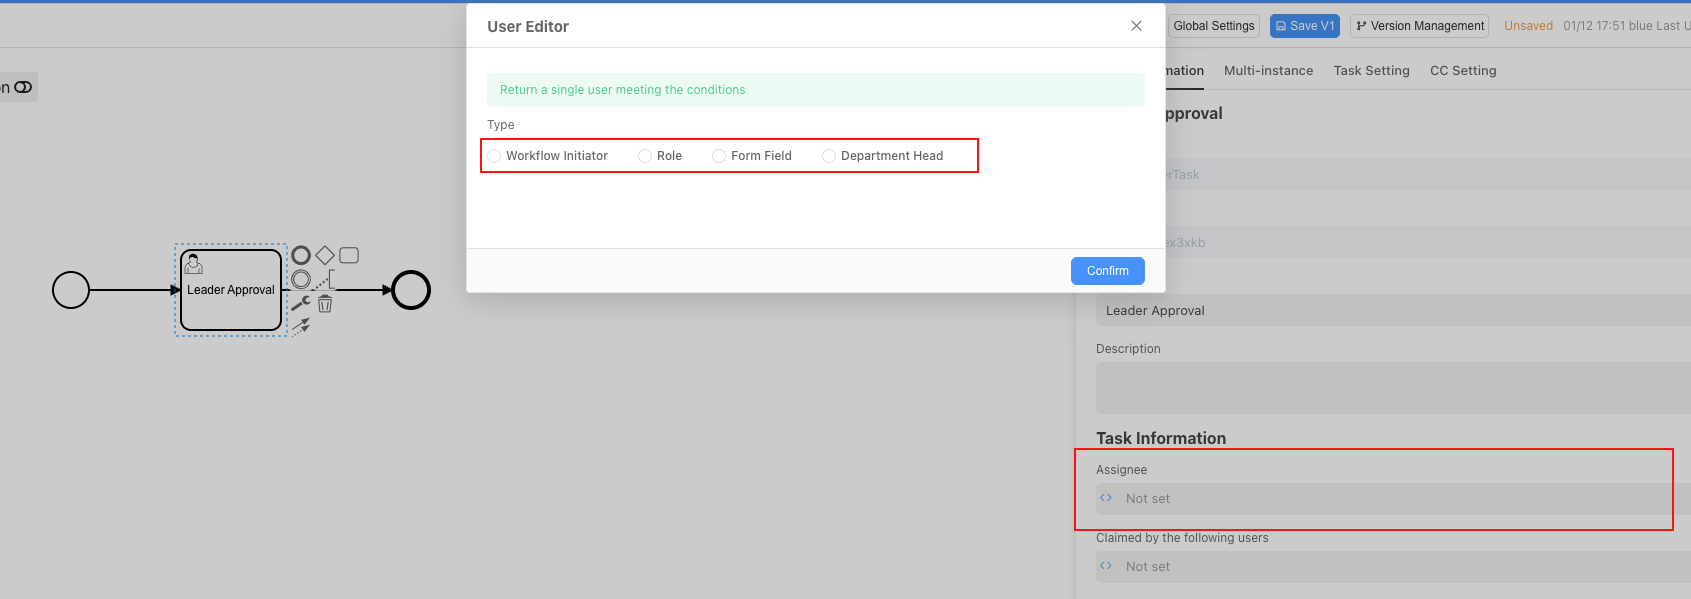
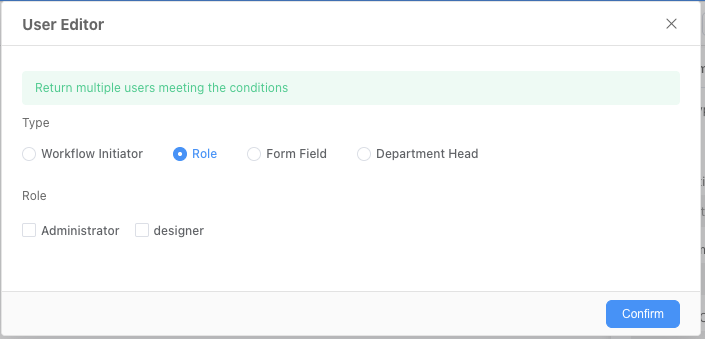
In the configuration window on the right side of the node, find the processor input box, click to select the head of the department.
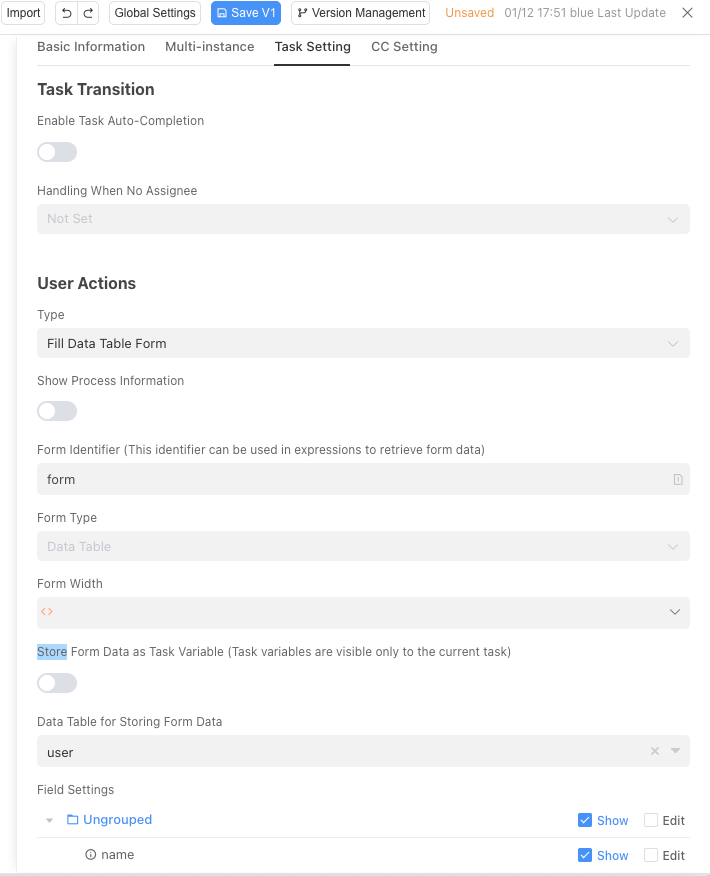
Enter the task settings, set the data table storing the form to the [Leave Application Form] we created earlier, and select the fields that supervisors should see during approval according to needs. Since supervisors only need to approve and do not need to edit, just check "Display".
Next, add two form controls for this user task: "Approve" and "Reject".
When approving the application, select the operation "Complete Task", and at the same time modify the Status field in the form to Supervisor Approved.
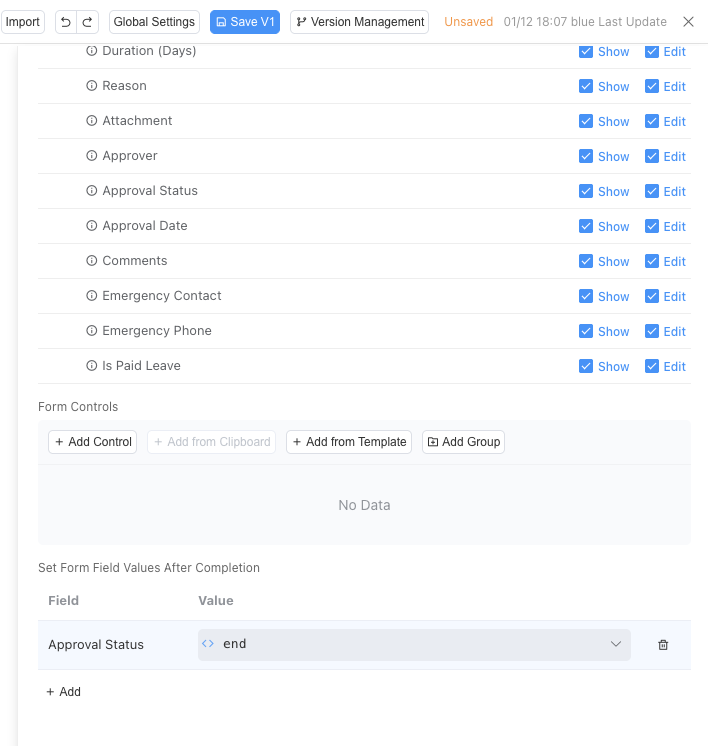
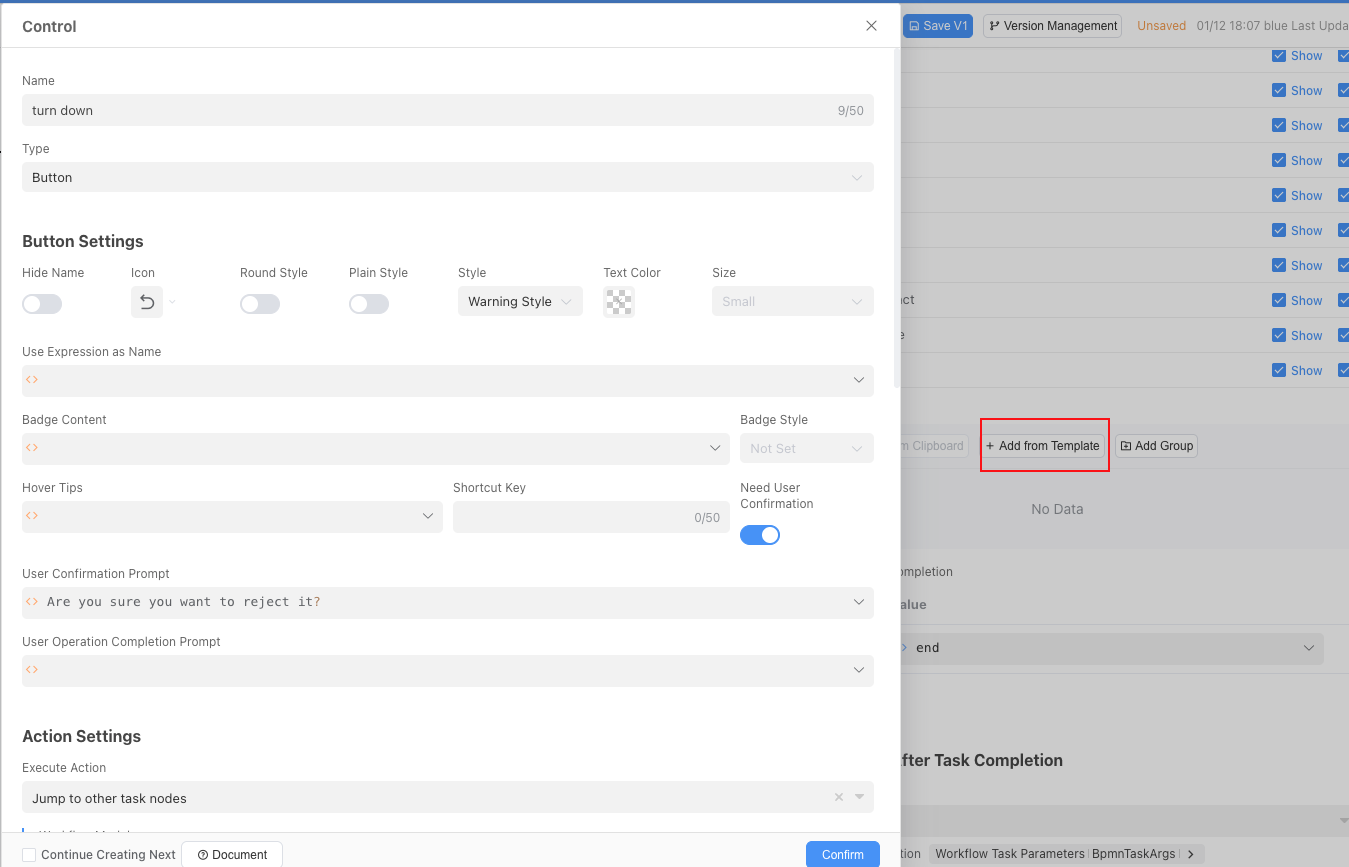
When rejecting the application, directly jump to the end node, and at the same time modify the Status field to Rejected.
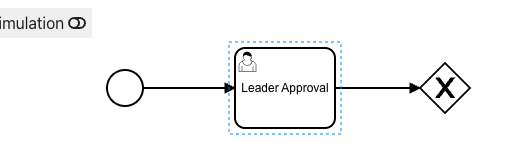
Decision Point: Connect an "Exclusive Gateway" (diamond mark) from "Department Supervisor Approval".
4.User Task: HR Specialist Approval
The operation is exactly the same as adding the first Department Supervisor Approval, except that the approver this time is the HR specialist. However, we need to consider a problem: in a company, there may be more than one HR specialist, and any HR approval is sufficient for any leave approval process. Therefore, we need to use OR Sign in this user task.
OR Sign means that in a workflow, any one of multiple approvers can approve to pass the approval. We need to configure it as "parallel execution" in the multi-instance configuration of the task node, name the variable "HR", and the specific configuration is as follows:
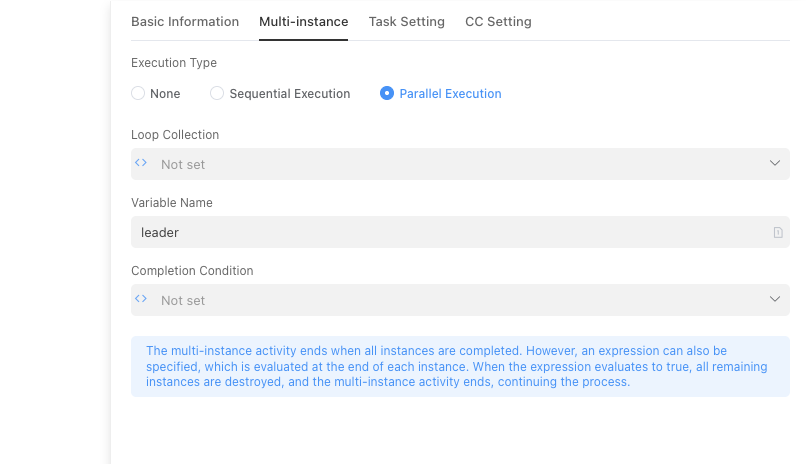
In the loop collection, select the approver as the HR role.
Select "Number of completed instances greater than 0" for the completion condition, which means that this task node is completed when any HR completes the approval.

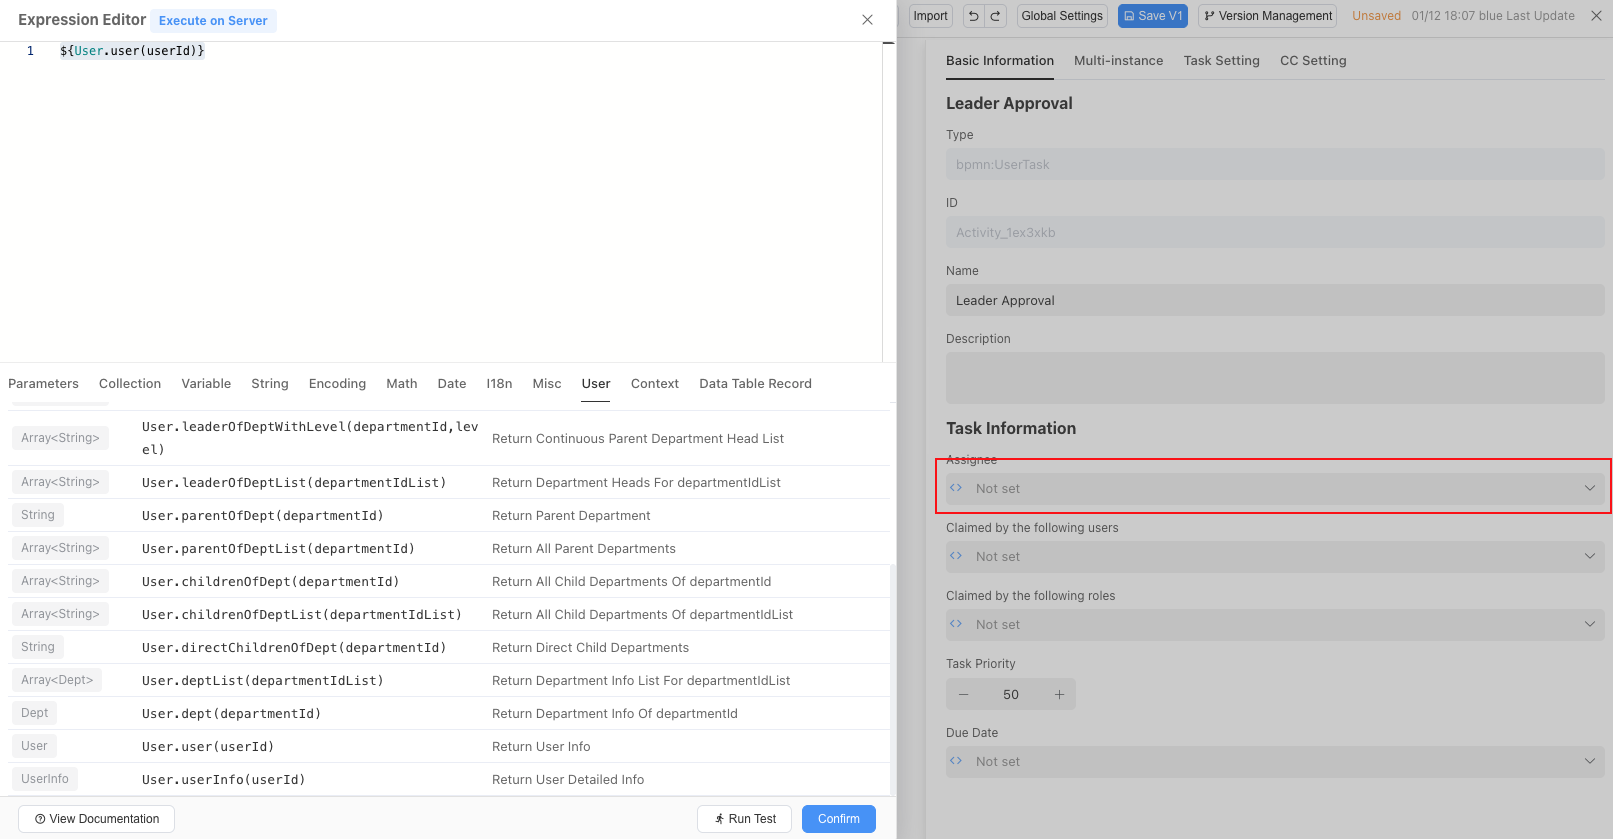
Then switch back to the "Basic Information" tab, click the dropdown button on the right side of the processor input box, select "Expression Editor", and enter ${HR} in the expression editor. Here, HR actually corresponds to the variable name HR we set in the multi-instance, as shown in the figure below:
Add an end node and connect all nodes with sequence flows, as shown in the figure below:
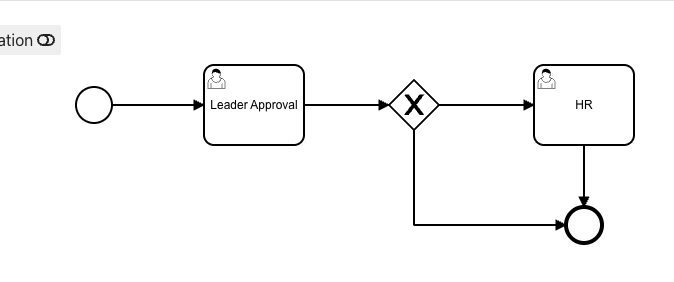
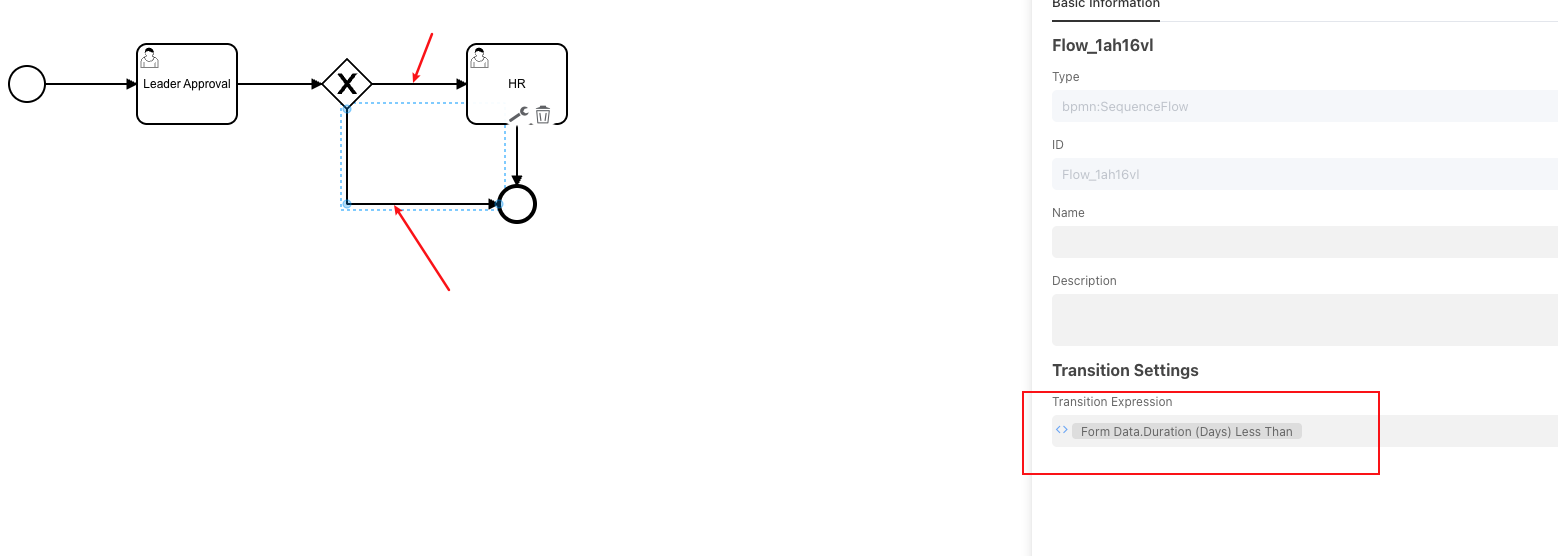
As can be seen in the above figure, we have two different paths that can eventually reach the termination node, one requiring HR approval and the other not. According to our initial rule requirements: Leave within 3 days only requires supervisor approval, leave exceeding 3 days requires HR specialist approval. We can see that we need to use the leave days as the condition for different flow directions. Click the two lines after the gateway respectively and configure the flow rules as follows. The system will determine the flow to the branch that meets the conditions according to the flow rules.
Then, refer to the first Department Supervisor Approval operation, configure the data table, and add "Approve" and "Reject" buttons.
After completing all configurations, click "Save", add viewing permissions for each role to the workflow module, and then publish your application.
4.3.4 Department Configuration
It should be pointed out that the department supervisor configured earlier refers to the departments configured in Informat's team configuration and the head of each department. If you are a platform administrator, you can configure it in the following interface:
Click the button on the right side of each department name to configure the head of the department.
4.4 Verification
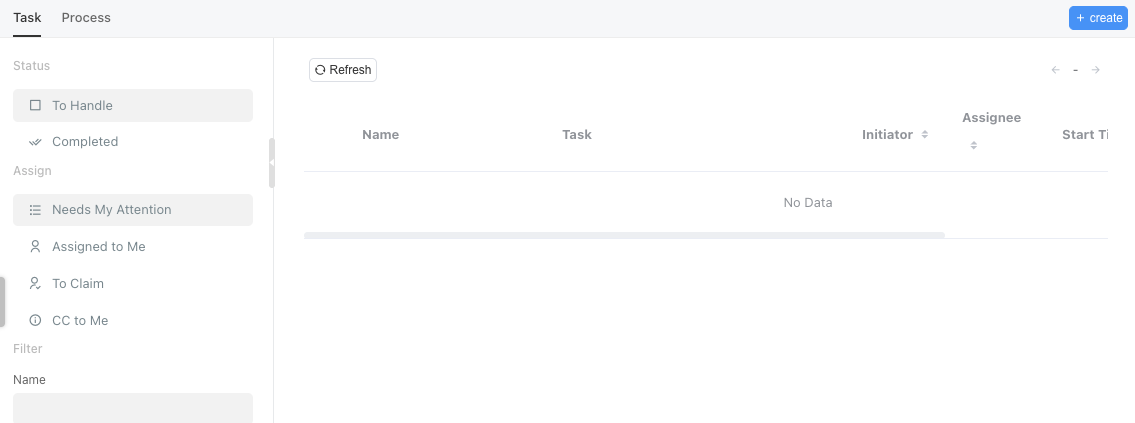
Use a user with the ordinary employee role to enter the application, open the Workflow module, click the Initiate Process button, and select the Employee Leave process.
In the pop-up input box, enter the leave information and submit.
Switch to the department supervisor's account, and you can see the following notification:

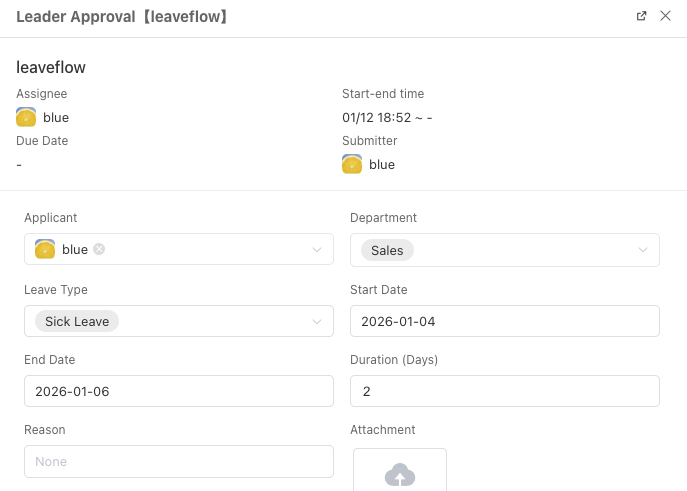
Click this notification, or click the bell button in the upper right corner of the screen to view the notification content, and you can choose to approve or reject as needed.
4.5 Chapter Summary
Congratulations! You have installed a powerful "process engine" for your application! In this chapter, you have mastered:
- Design and create supporting data tables for business processes.
- Complete workflow construction process: from triggering, approval, branching, to data updating.
Your application is now no longer just a data recording tool; it has become an intelligent process platform that can actively execute business rules and drive team collaboration.