3.8 Creating the Second Table: [Employee Table] and Establishing Relationships
Next, let's create the employee table. The core of the employee table, in addition to the employee's own information, is that every employee must belong to a department. This introduces a crucial concept in Informat — association relationships.
What is an association relationship?
Imagine when you're filling out the [Employee Table], you need to specify the department for employee "Zhang San". You could certainly type "R&D Department" manually, but this approach has obvious drawbacks:
- Prone to errors: You might accidentally type "R&D Dept" or "Development Department", leading to data inconsistencies.
- Information isolation: The system doesn't know that the text "R&D Department" you entered is the same as the record in our [Department Table]. When we want to view all employees in this department, the system can't associate them.
The "Association Relationship" field type was created to solve this problem. It allows you to directly reference an entire record from another table in one table. When selecting a department for an employee, you no longer type text manually, but choose from a dropdown list (the list content is exactly all existing records in the [Department Table]).
In this way, data changes from isolated text to structured data that is interconnected and traceable.
Step 1: Create the [Employee Table] and Add Basic Fields
- Following the steps above, create a new data table named
Employee Table. - Add the following basic fields to the [Employee Table]:
Name(single-line text field)Photo(attachment field)Date of Birth(date and time field)
Step 2: Establish Association with the [Department Table]
This is the most critical step in this section!
Operation: Click "Add Field" and select "Associated Record" in the field type.
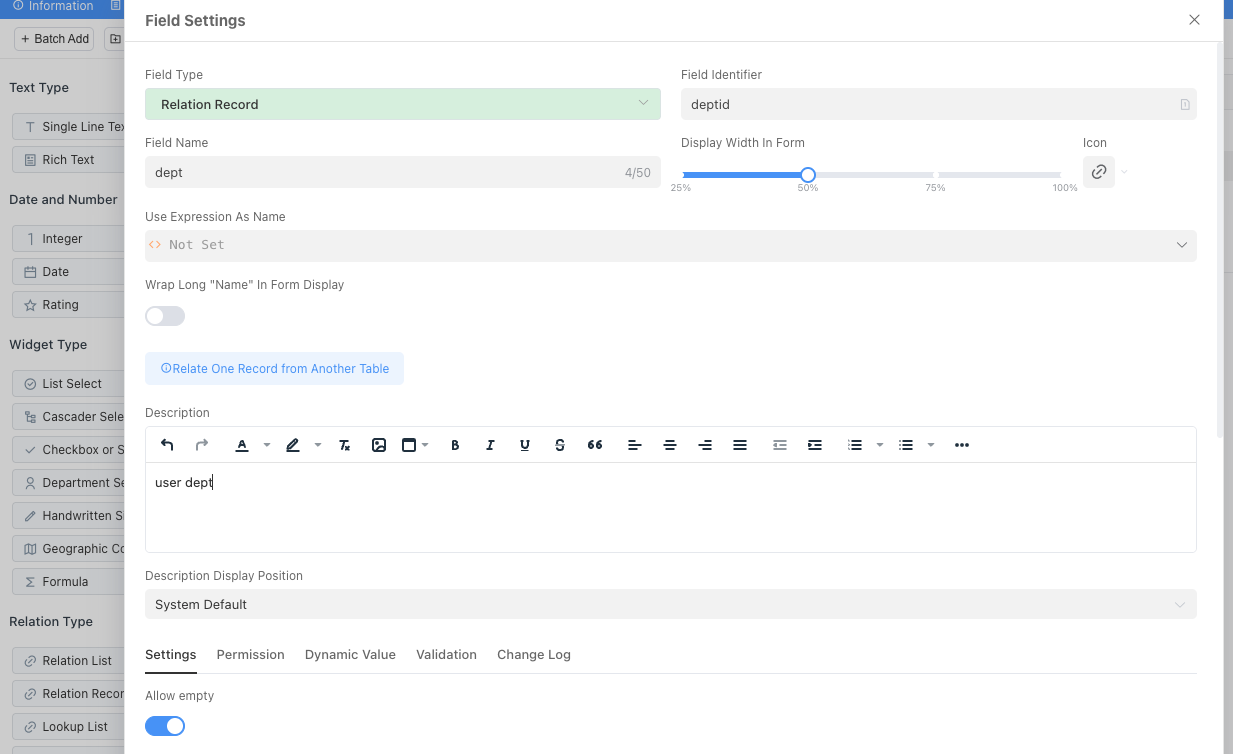
Field Settings:
Field Name: First, give this field a clear name. EnterDepartment.Associated Table: This is the most critical step! Click the dropdown here to select the destination our "bridge" will lead to —Department Table.Associated Record Display Name Field: This option is very "smart". It's asking you: "When users select a department, which field from the [Department Table] do you want them to see to identify different departments?" The obvious answer isName.Associated Record Storage Field: This is how the system works "behind the scenes". It uses a unique identifier (usuallyid) of the associated record to establish an accurate connection, ensuring that even if the department name changes in the future, the association relationship won't break. Beginners can just useid.
After completing the settings, save the field.
Step 3: Configure Table Settings, Complete Display and Filter Settings
In the table settings, set all fields to be displayed, and set Department and Name as filter fields.

After completion, publish the application, and we can see and use the department table. Moreover, our data model is no longer two isolated tables; they are tightly connected through the "Department" bridge.
Chapter 4 Global Settings for the Application
So far, all our work has focused on the "interior decoration" — creating data tables (room layout) and configuring views (furnishings in the room). However, a complete application also needs a unified appearance style and clear navigation structure, which is the mission of "global settings".
In this chapter, we will learn how to adjust the application's name, icon, color theme, and most importantly — the layout of the navigation menu. These settings will define users' first impression when interacting with your application.