Chapter 2: Guardian of Data - Configuring Roles and Permission Control
Imagine, in a real corporate environment, if all employees could see:
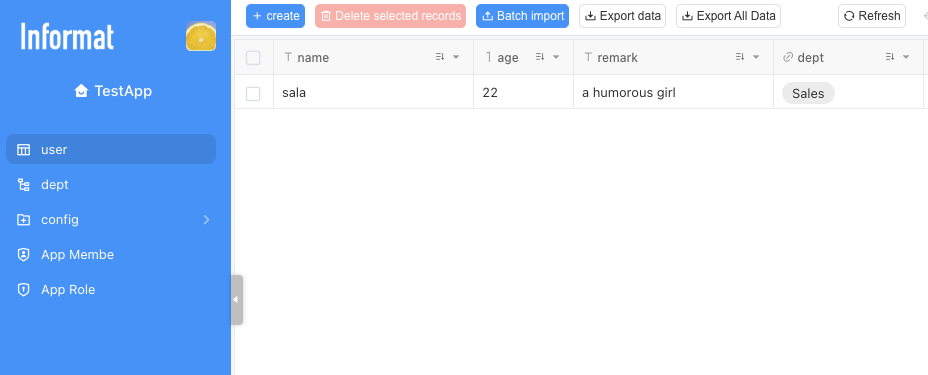
- Sensitive fields: Everyone could open the [Employee Table] and view others' core privacy data such as "salary" and "performance rating".
- Non-responsibility modules: Financial personnel could access HR's [Human Resources Dashboard], or ordinary employees could enter the [Application Designer] to make modifications.
- Cross-departmental data: A R&D department supervisor could view performance records of marketing department employees.
Obviously, this is unacceptable.
The Informat AI Low-Code Platform provides you with a sophisticated three-layer permission protection system through its powerful "role permission" mechanism, ensuring that each user can only "view" and "operate" data within the authorized scope:
| Permission Level | Security Role (Metaphor) | Corresponding Informat Function |
|---|---|---|
| Module-level | "Main gate access control": Determines which functional areas (modules) a user can enter. | Module settings, role permissions |
| Field-level | "File mask": After entering a module, hides or makes certain fields read-only. | Field settings - permissions |
| Record-level (Row-level) | "Laser fence": Dynamically filters to show only data records related to the user's responsibilities. | Data table view - dynamic filter conditions |
This chapter will guide you step by step to configure these three security lines for your application, creating an impenetrable data fortress.
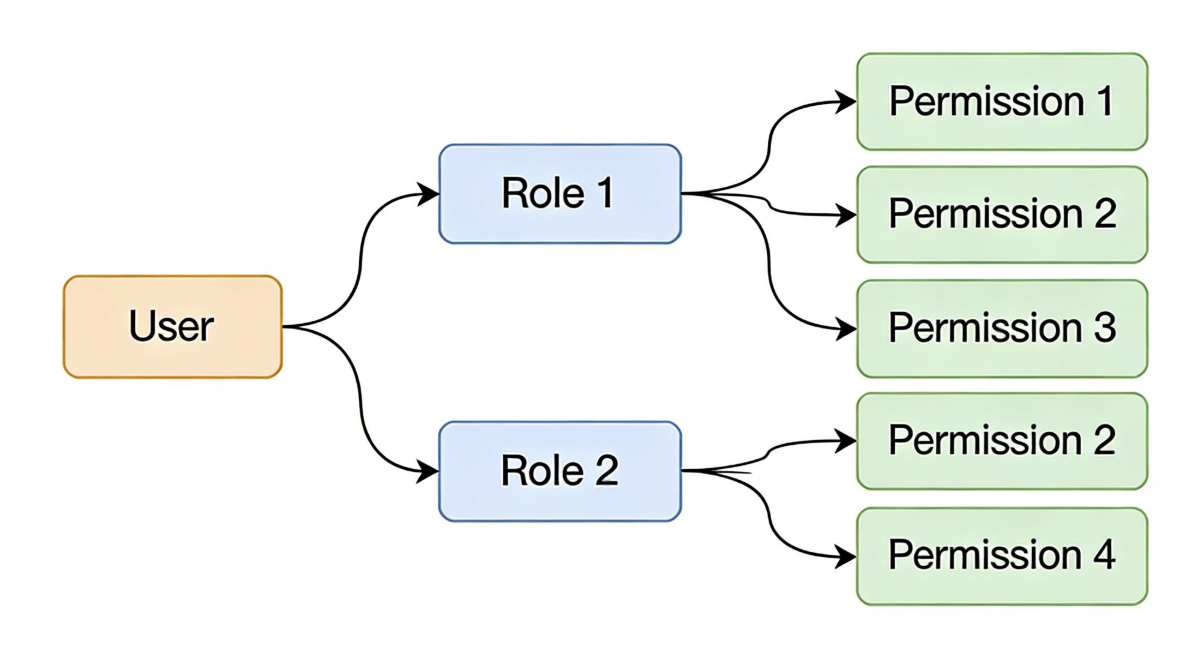
2.1 Core Concept: Role - "Digital Pass" for Permissions
In Informat, the core of permission control is RBAC (Role-Based Access Control). Permissions are not directly granted to specific users like "Zhang San" or "Li Si", but to a role (such as "Department Supervisor"). If you need a more detailed understanding of Informat's role concept, you can click this link Role Permissions.
Why use roles?
This way, you don't need to configure dozens of permissions for each new employee individually. You just need to assign new employees to pre-defined roles, and they will immediately get all the permissions of that role, greatly simplifying user management and authorization processes.
A user can have multiple roles, thereby obtaining the permission set of multiple roles. For example, an employee can be both a "Department Supervisor" and an "HR", and he will have all the permissions of both roles.
2.1.1 Practice Preparation: Create and Assign Core Roles
For refined management, we first create and configure two custom roles in the application:
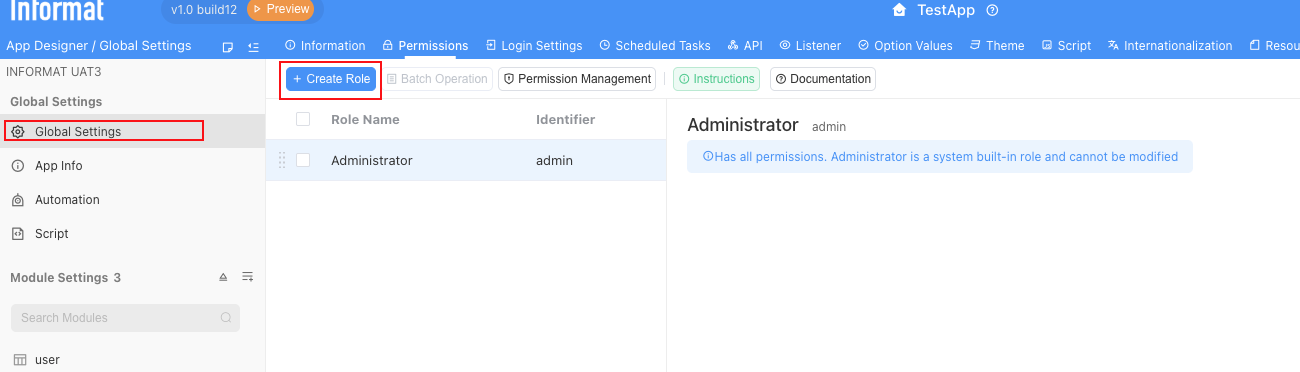
Enter role permission management: In the Application Designer, find the [Global Settings - Role Permissions] module.
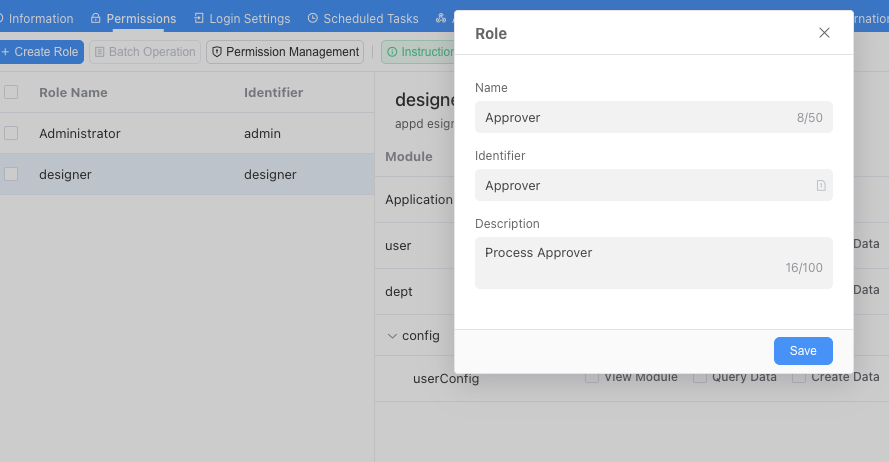
Create custom roles:
Create the following three custom roles (the system already has a "Admin" by default; since the admin has full system permissions, please don't give admin permissions to any company employees except those who need to develop applications):
[HR Specialist]: Can view and edit complete data of all employees, with the highest HR data permissions.
[Department Supervisor]: Responsible for approving leave in their own department, can only view and edit employee data in their own department.
[Ordinary Employee]: Can only view their own data.
Configure role identifiers: When creating custom roles, Informat supports customizing and modifying role identifiers. Ensure that identifiers are clear (usually use English words for roles, no spaces in identifiers), because advanced permission configurations (such as expressions, scripts) will rely on these identifiers for calculations.
2.1.2 Add Members to the Application and Assign Roles
After creating "roles", the next step is to "invite" colleagues into this application and configure the correct roles for them.
First, enter the Application Designer and add the application member management module as shown in the figure:
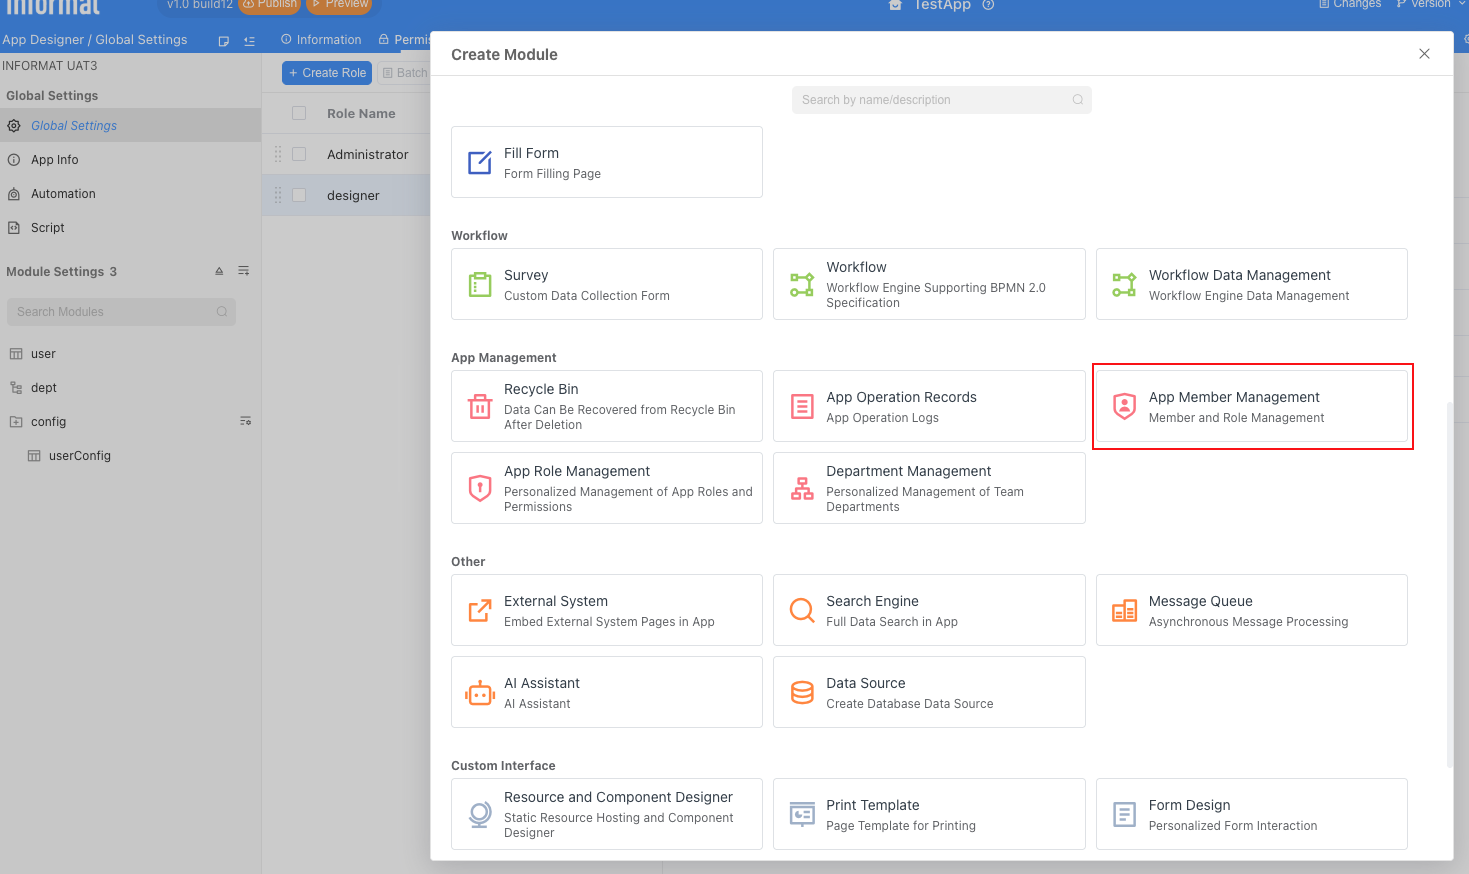
After adding, just publish the application. Next, enter the application, and we will see the member management interface, which lists all users who have permission to access this application (currently only you).
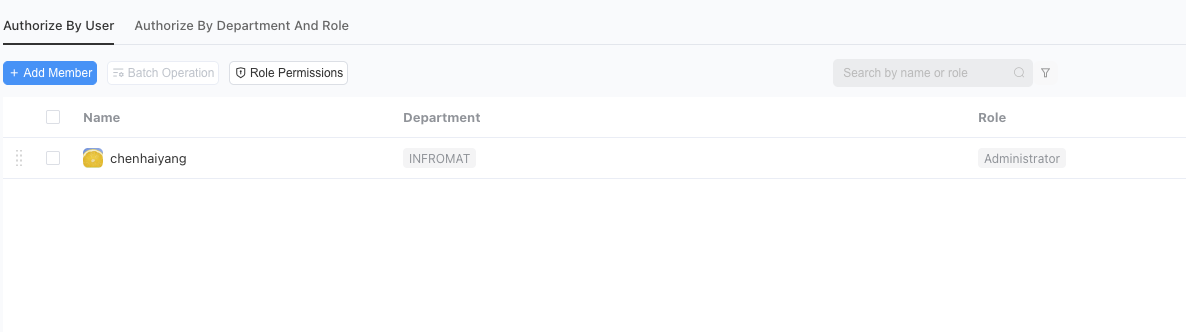
Add application members:
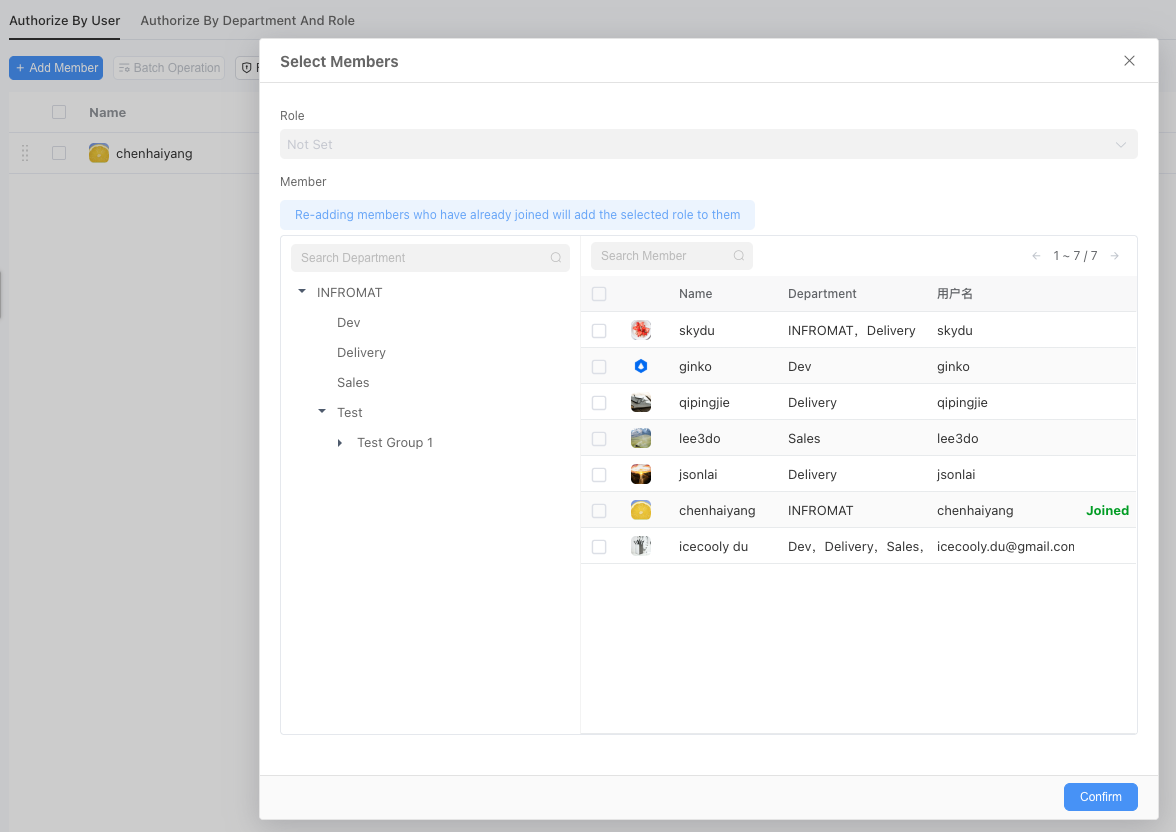
Click the
+ Add Memberbutton in the upper left corner of the page.In the pop-up window, you can select colleagues who need to access this application and their roles from your enterprise address book (organizational structure), then confirm the addition.
Modify roles for members:
After adding members to the application, their roles may change, and we can modify them.
- In the member list, find the added colleague.
- Click the "Edit" icon (pencil style) in that row.
- In the pop-up role selection menu, select the most suitable role for that member. For example:
- Select [Department Supervisor] role for your supervisor account.
- Select [HR Specialist] role for your HR account.
- Select [Ordinary Employee] role for your ordinary employee account.
- For the convenience of subsequent testing, you can set yourself to have the [Admin], [Department Supervisor], [HR Specialist], and [Ordinary Employee] roles simultaneously.
2.2 Practice One: Module-level Permission Control (Access Control)
Module-level permissions are the first line of defense in the permission system. It determines which functional entries users can see in the left navigation bar after logging into the application.
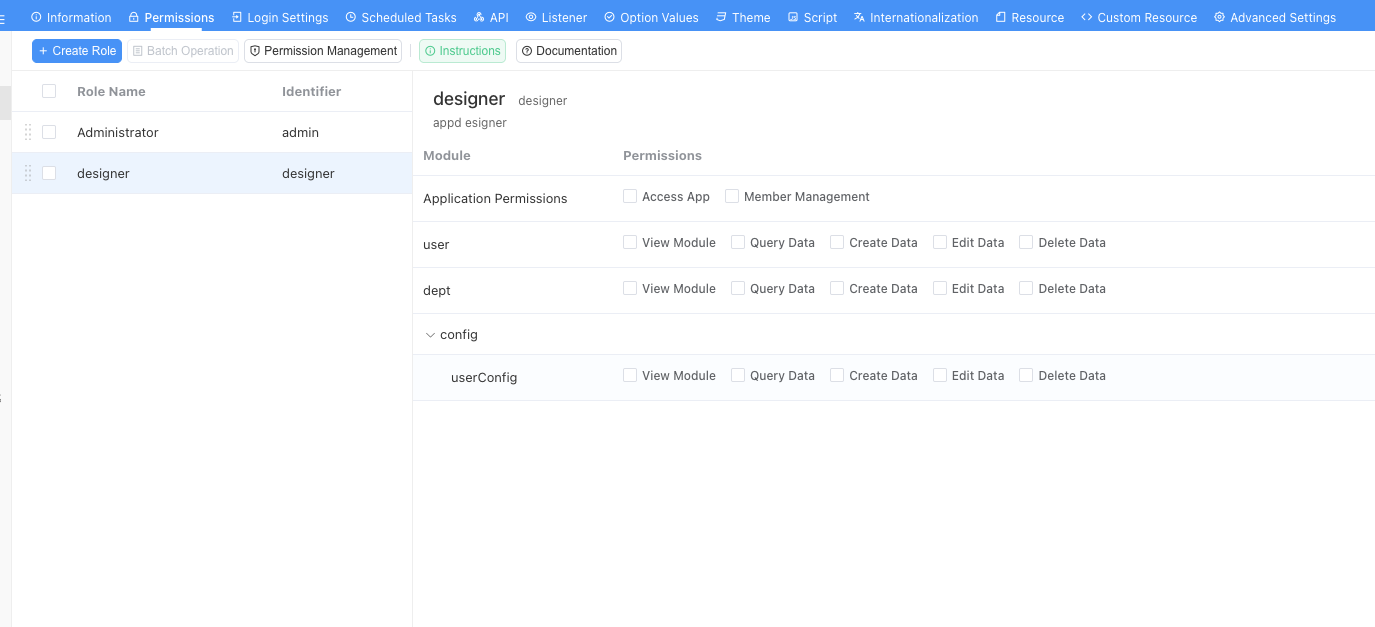
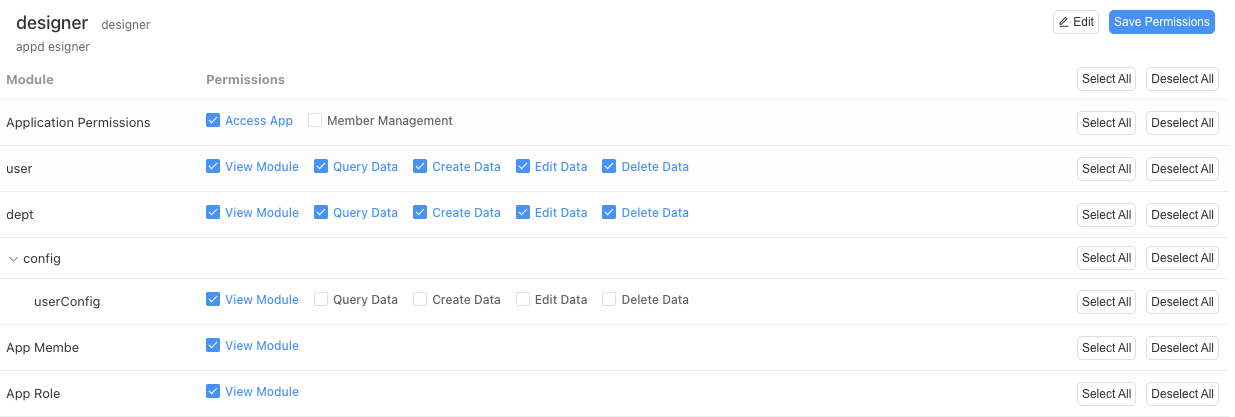
Set permissions for specific roles: Click on any role created in the above steps, and you will see the following interface.
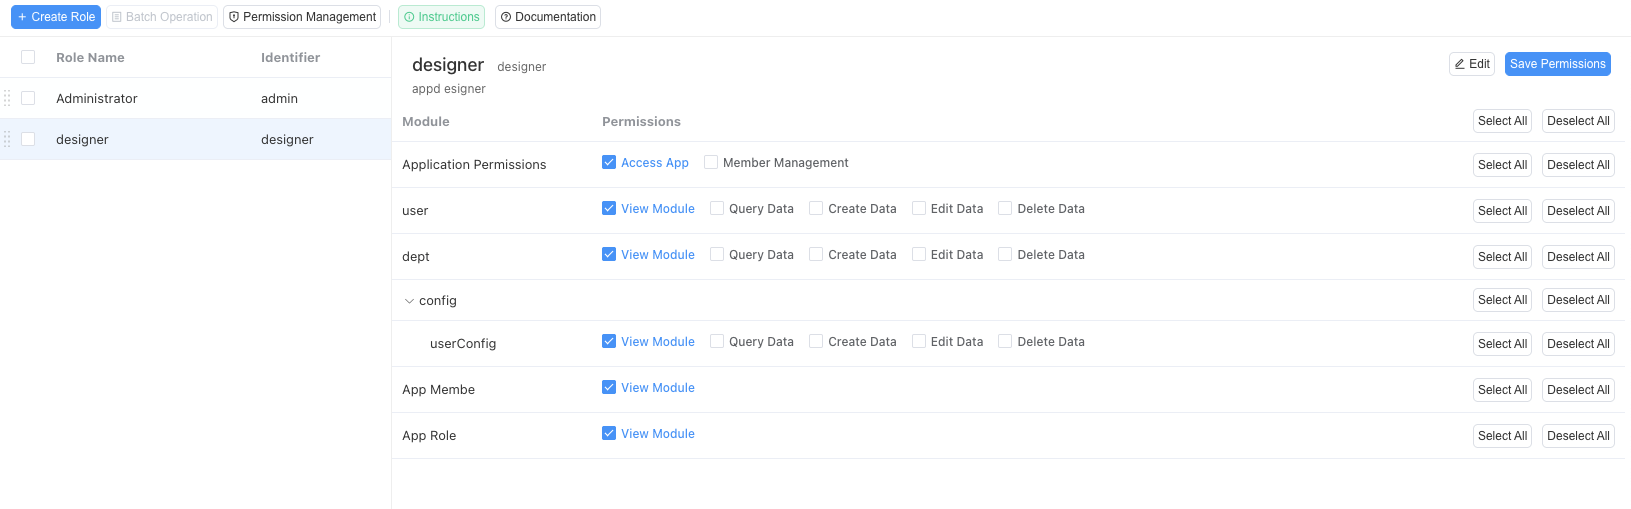
In the above figure:
Access Application: Only roles that check this permission can actually use our employee management system. Theoretically, all roles you create should check this permission.
Member Management: Roles with this permission can add or delete users from our employee management system on their own.
View Module: This is the permission for specific modules (such as "Department Table", "Employee Table"). After checking, it means that the role can access or view the corresponding module.
Query Data: Indicates that the role is allowed to view existing data in the module.
Create Data: Indicates that the role is allowed to create new data records in the module.
Edit Data: Indicates that the role is allowed to edit existing data records.
Delete Data: Indicates that the role is allowed to delete data records.
Next, we analyze and configure permissions for specific roles:
Ordinary Employee: Ordinary employees can view their own data in the employee table, so they can view the employee module and query data, but they should not be able to create new employees, nor modify existing employee data, nor delete existing employees. Therefore, his permission configuration is as follows (remember to click Save Permissions after modification):
Department Supervisor: Department supervisors can view and manage all employee data in their own department. So they can view the employee module and query employee data in their own department. Therefore, their module permissions are consistent with ordinary employees. The main difference between department supervisors and employees is in the data and field permissions we will introduce later.
HR Specialist: HR specialists can view and manage employee data across the company. So they can view the employee module, query data of all employees in the company, and can create new employees and modify existing employee data. However, they should not usually be able to delete existing employees (resignation should generally go through a special resignation process, not simple data deletion, this function will be shown in our later advanced application documentation). Therefore, his permissions are as follows:
2.3 Practice Two: Field-level Permission Control (Data Masking)
Field-level permission control is used to protect individual fields within data forms. This is a key means of protecting sensitive data such as salary, contract information, etc.
Scenario: In the [Employee Table], we add a sensitive field: "Salary".
We must ensure that [Department Supervisors] and [Ordinary Users] cannot see it, and only HR specialists can see this field.
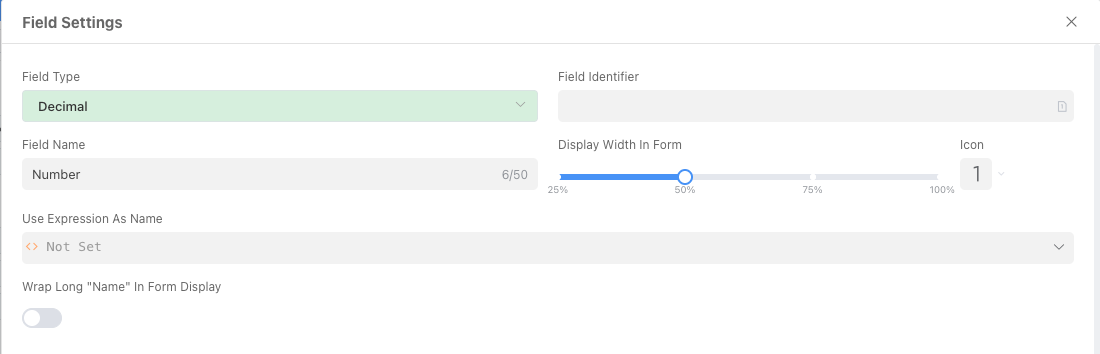
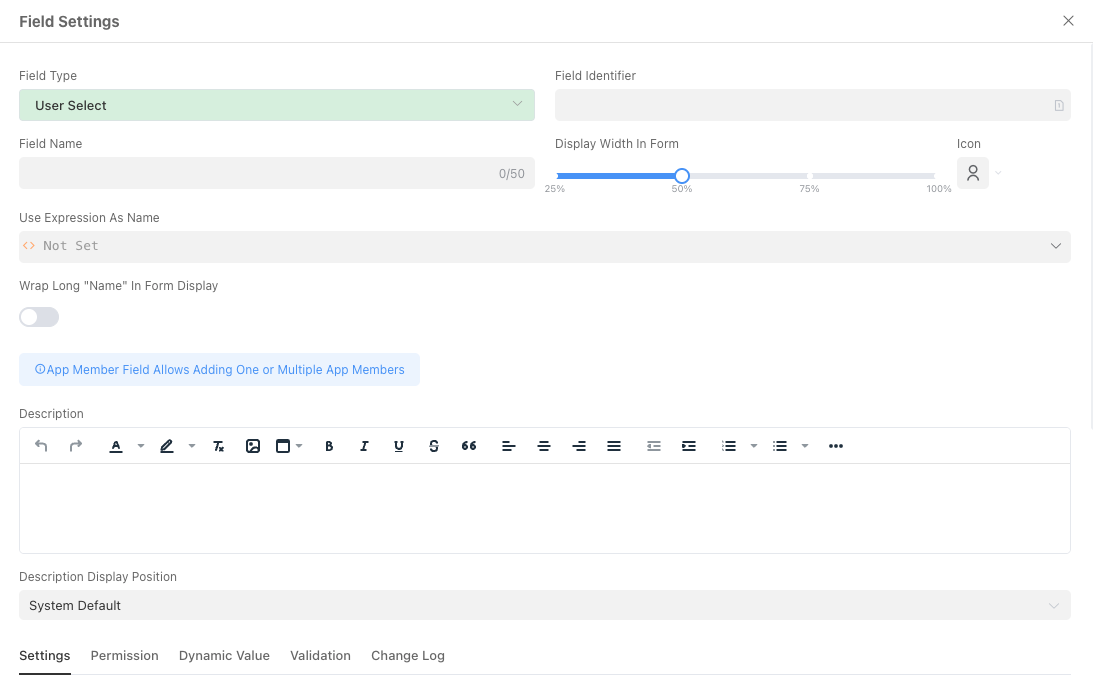
Enter field design: Enter the [Employee Table] module, then click the "Form Fields" tab, find and click the "Salary" field to enter the detailed field settings.
Configure permissions: At the bottom of the field settings panel, find the [Permissions] tab, check "Hide this field in the form".
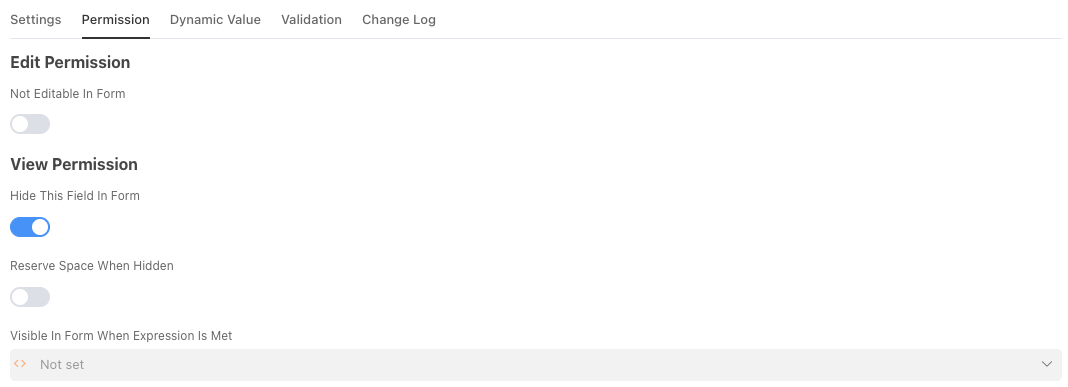
After checking this option, this field will be hidden from all users. So how to make it visible to HR specialists? This requires using another important capability of Informat: the Condition Editor. Click the input box "Visible in form when the expression is satisfied", and the system will pop up the Condition Editor window for you.
2.4 Rule Setting Center: Condition Editor
2.4.1 What is the Condition Editor used for?
You can imagine the "Condition Editor" as the "intelligent brain" or "rule setting center" of an application.
Its core function is to allow you to set dynamic, variable trigger conditions for various behaviors of the application (such as showing/hiding fields, whether they are required, etc.). Ordinary function settings are "one-size-fits-all" static rules (for example, a field is always hidden), while the Condition Editor allows you to implement "if...then..." intelligent, refined control.
Through it, your application will no longer be a rigid form, but an intelligent system that can dynamically change its behavior and appearance according to the current logged-in person, the current data content, and even the current time.
2.4.2 Interface Function Detailed Explanation
The entire Condition Editor interface is mainly composed of the following parts:
A. Condition Group Logic
When [all / any] of the following conditions are met
This is the "main logic switch" of the entire condition group. It determines what relationship multiple conditions should have when you set them.
All(AND logic):- Meaning: All the conditions defined below must be satisfied at the same time for the entire rule to be valid.
- Example: If you set two conditions: 1.
Current User.RolecontainsDepartment Supervisor, 2.Current Record.StatusequalsUnder Approval. Then this rule will only take effect when a department supervisor is viewing a record that is under approval.
Any(OR logic):- Meaning: The entire rule is valid as long as any one of the conditions defined below is met.
- Example: If you set two conditions: 1.
Current User.RolecontainsDepartment Supervisor, 2.Current UserequalsCurrent Record.Creator. Then this rule will take effect when either a department supervisor or the creator of the record is viewing the record.
B. Condition Rows
Each row is an independent, specific judgment rule. It consists of three parts, which together form a complete "subject-predicate-object" logical sentence.
[Checking Object][Comparison Method][Target Value]
First part: Checking Object (Subject)
Function: Defines "What are we checking?". After clicking "Add Judgment Condition", the system will let you select a dynamic variable from the current "context".
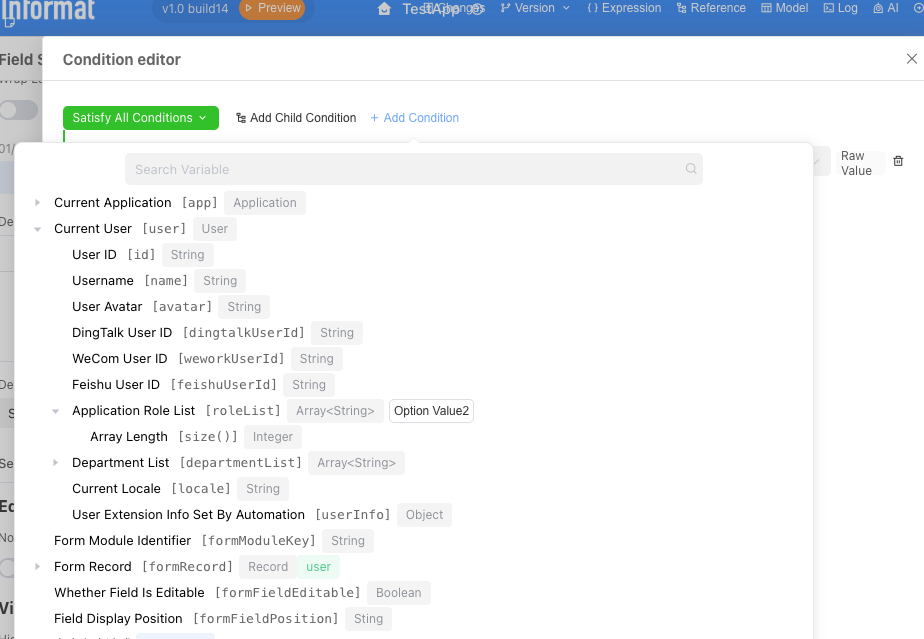
Common variables:
Current User: Refers to the person currently operating the system. You can get their name, role, department, etc.Current Record: Refers to the data currently being viewed or edited. You can get the value of any field in this data.System Variables: Can get current system time and other information.
Second part: Comparison Method (Predicate)
- Function: Defines "What method do we use to compare?". This is a comparison operator.
- Common operators:
Equal to / Not equal to: For precise matching.Contains / Does not contain: Determines whether a list (such as user roles) contains a certain value.Greater than / Less than / Greater than or equal to / Less than or equal to: For comparing numbers or dates.Is empty / Is not empty: Determines whether a field has content entered.
Third part: Target Value (Object)
- Function: Defines "What is our standard?". This is a fixed value you set for comparison.
- Value types: It can be a specific role (such as "HR Specialist"), a text (such as "Approved"), a number, or a date.
C. Operation Buttons
- Delete button: Located on the right side of each condition row, used to delete the current condition.
OK/Cancel: Located at the bottom of the editor, used to save the set of rules you built or cancel modifications.
2.4.3 What can it be used for?
The application scenarios of the Condition Editor are extremely wide, far beyond just controlling field visibility. Here are some common examples:
Scenario 1: Dynamic Visibility (This Example)
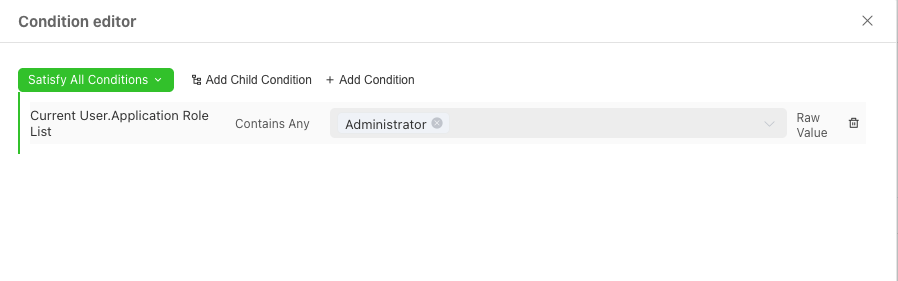
- Requirement: The "Salary" field is only visible to "HR Specialists".
- Rule:
Current User.Application Role Listcontains any one ofHR Specialist, configure as shown in the figure below and click OK
Scenario 2: Data Verification
- Requirement: In project management, the "Actual Completion Time" of a task cannot be earlier than the "Planned Start Time".
- Rule: Set verification conditions for the "Actual Completion Time" field ->
Current Record.Actual Completion Timeless thanCurrent Record.Planned Start Time-> (Report an error if satisfied)
Scenario 3: Dynamic Read-only
- Requirement: Once an application form enters the "Under Approval" status, the "Application Reason" field can no longer be modified.
- Rule: Set read-only conditions for the "Application Reason" field ->
Current Record.Approval Statusnot equal toDraft
Scenario 4: Button Permission Control
- Requirement: The "Reject" button on the approval page can only be seen by roles at the level of "Department Supervisor" or above.
- Rule: Set display conditions for the "Reject" button ->
Current User.RolecontainsDepartment SupervisororCurrent User.RolecontainsGeneral Manager
2.5 Practice Three: Record-level (Row-level) Permission Control (Part 1)
Record-level permission control is the most complex and most enterprise-level management part of the three-layer protection. It requires the system to dynamically filter the data rows a user can see based on the current logged-in user's identity, department, position, and other information.
Scenario: We must ensure that the [Ordinary Employee] role, no matter how they access the [Employee Table], can only see employee records that belong to him, and cannot see others' data.
Obviously, we need to solve a problem first: how do we know which employee of the company the user currently accessing the application is? In other words, how do we establish the association between user accounts and employee table data in the system?
2.5.1 Pre-operation 1: Add "Associated Account" Field to Employee Table
To solve this problem, we first need to add an "Associated Account" field to the employee table. This field will act as a bridge, precisely connecting abstract "system login users" and concrete "employee information records".
After the field is created, publish the application. Next, we need to populate this field for existing data.
Enter the data view of the [Employee Table].
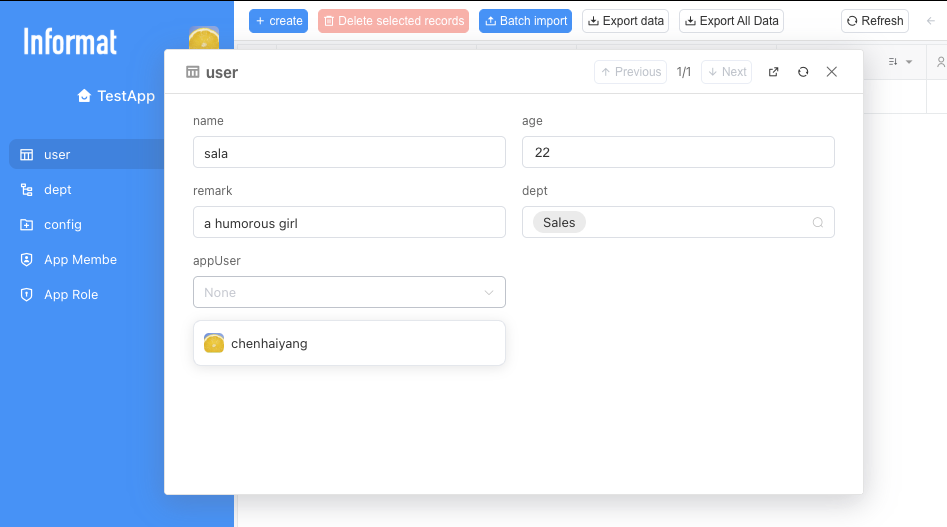
Edit each existing employee record and select the corresponding system user in the "Associated Account" field.
After completing this step, our preparation work is truly complete. Now, each employee record in the system is firmly bound to a unique user identity through the "Associated Account" field. We already have the most critical prerequisite for implementing record-level permission control.
Next, we can use this "binding relationship" to create that core permission rule.
2.5.2 Step 1: Create Combined Query Conditions
As mentioned in the introductory tutorial, views are "exquisite exhibition halls" that extract data from data warehouses (data tables) and present it according to rules. We need to create a dedicated "exhibition hall" for [Ordinary Users].
Enter view settings: Enter the [Employee Table] module, click the [Table Settings] tab, and then click to enter the next-level [Filter Conditions] tab.
Click the Add button to start adding filters.
2.5.3 Step 2: Configure Dynamic Filters for Ordinary Employees
Unlike the "fixed filter conditions" we set in "Quick Start" that apply to all users, "dynamic filters" are an intelligent, personalized filtering layer. It can dynamically decide "whether this view is visible to him" and "what data he can see in the view" according to who the user currently accessing this view is.
According to the page layout, dynamic filters mainly include two core functions:
1. View Visibility
Page description: "Set filter conditions, users who meet the conditions can see this view"
Function interpretation: This function is used to control access permissions for the entire view. You can think of it as setting an "intelligent access control" for the entrance of this view. Only users who meet the conditions you set can see and enter this view in the application's navigation menu. For users who do not meet the conditions, this view is as if it does not exist.
For the current scenario, we can set the view to be visible only to ordinary employees.
2. Data Filtering
Page description: "Set dynamic filter conditions, only show data that meets the conditions when the view is opened"
Function interpretation: This function is used to dynamically filter the data rows displayed in the view according to the identity of the current visitor. It ensures that even if multiple different people access the same view, the data content they see is personalized and "different for each person".
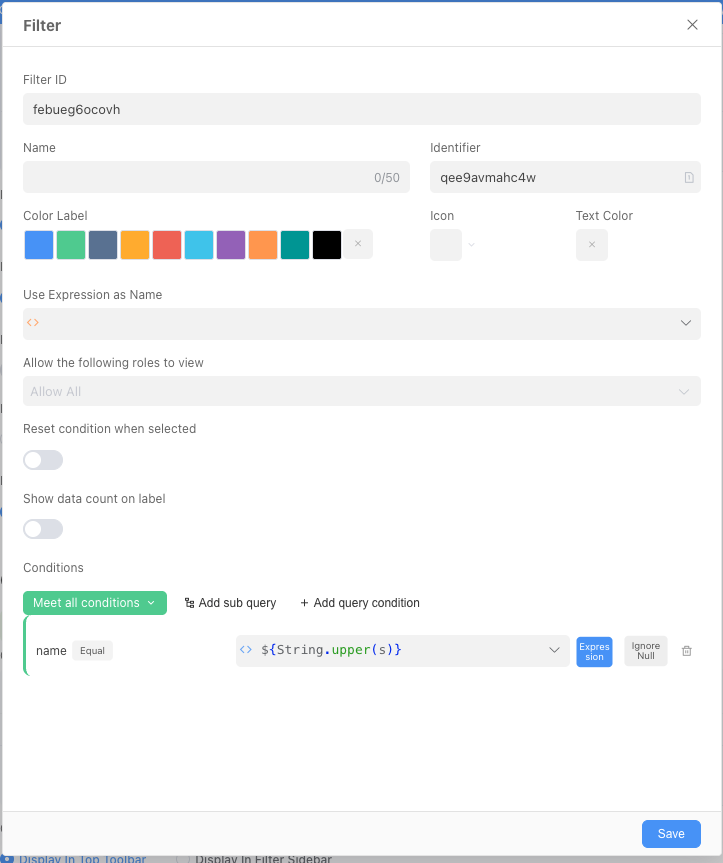
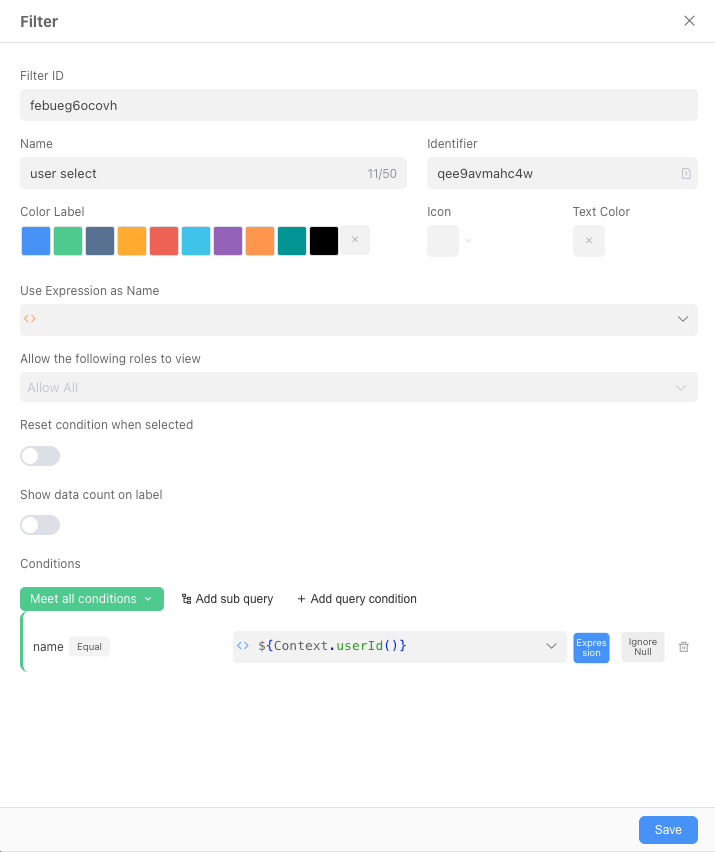
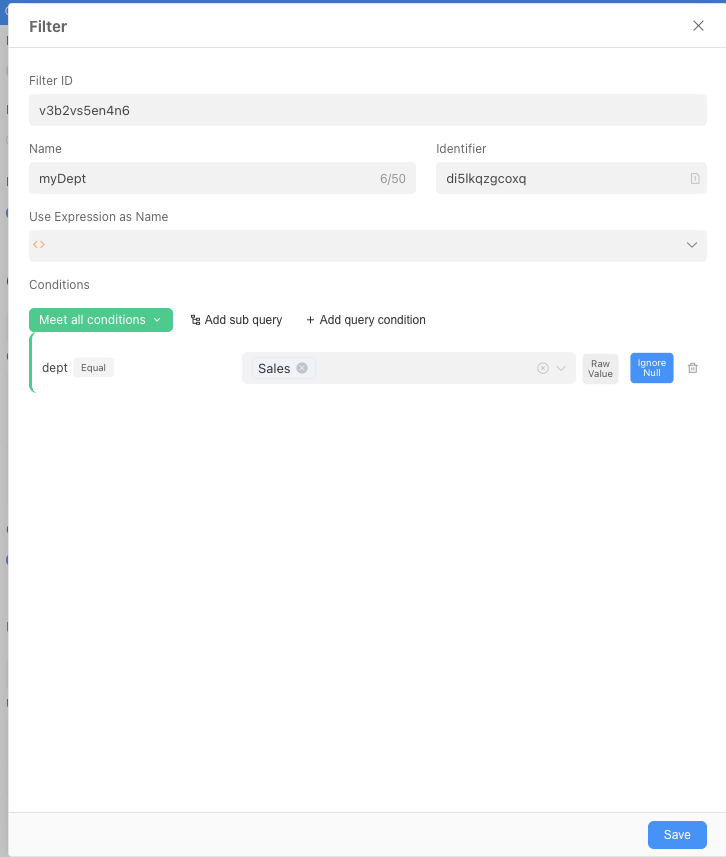
For the current scenario, we only need to add a query condition at the condition: Associated Account equals a certain expression.
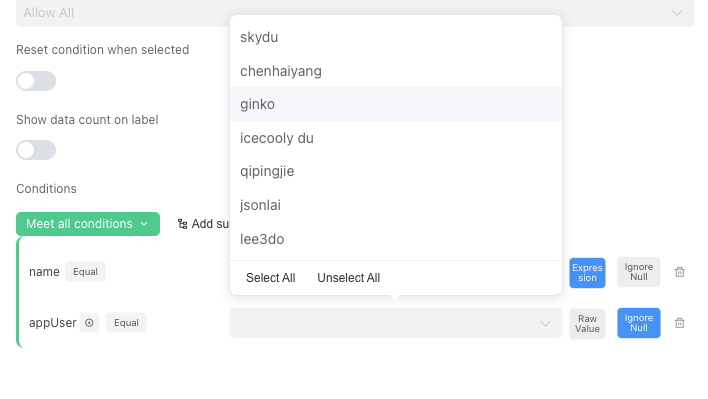
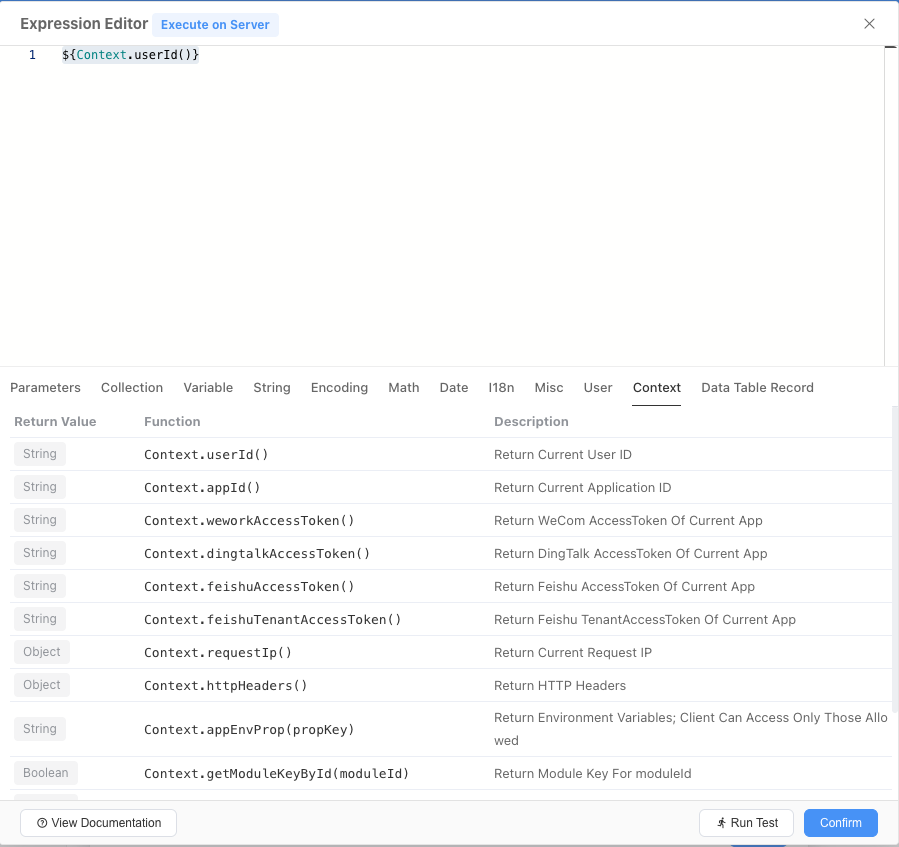
Click the input box on the left side of the expression in the figure, and a window for expression selection will pop up. A complete understanding of expressions requires a good knowledge of programming, if you want to delve deeper, you can click this linkExpression.
Or you can directly switch to the current window's context tag, click the first Context.userId() and confirm it (remember: only click once!).
Finally, we will get a filter like the one below, which is only visible to ordinary employees, and in this filtered view, only their own data can be seen:
2.5.4 Verify the Effect
After completing the above operations and publishing the application, enter the application (ensure that the account you are currently logged in with has the role of ordinary employee), view the employee table, and you can see that no matter how much data was originally in the employee table, now only the data where the associated account is the current account can be seen.
2.6 Practice Four: Record-level (Row-level) Permission Control (Part 2)
In the previous section, we implemented that ordinary employees can only see their own data by adding combined query conditions. However, if you log in with a supervisor or HR user, you will find that you cannot see other employees' data now. This is because we currently only have a combined query condition visible to ordinary employees. Therefore, we need to add their respective combined query conditions for department supervisors and HR respectively. At the same time, to realize the function that department supervisors can only view employee data in their own department, we need to add a field in the employee table—Department Supervisor (if you learn more about Informat's automation and expressions in the future, you may find that you can also realize this function without adding this field. This is also our Informat design concept: provide different levels, different complexity solutions for the same business scenario to adapt to users of different levels, there are many ways to Rome.).
2.6.1 Add "Department Supervisor" Field to [Employee Table]
In order to easily judge "whether the supervisor of a certain employee record is the current logged-in user" when setting permission rules, we need to add a field in the [Employee Table] to display the department supervisor of that employee.
Here we use a clever method without manual data maintenance.
Enter field design: Return to the application design interface of "Employee Information Management System", enter the "Form Fields" design page of [Employee Table].
Add "Associated Record Field":
Click "Add Field", select
Associated Record Fieldin the field type.Field Name: Enter
Department Supervisor.Source Field: This is the most critical step. Select the existing
Departmentfield in [Employee Table].Associated Field: After selection, the system will let you select a field from [Department Table] to associate and display. Here, we select the
Department Supervisorfield.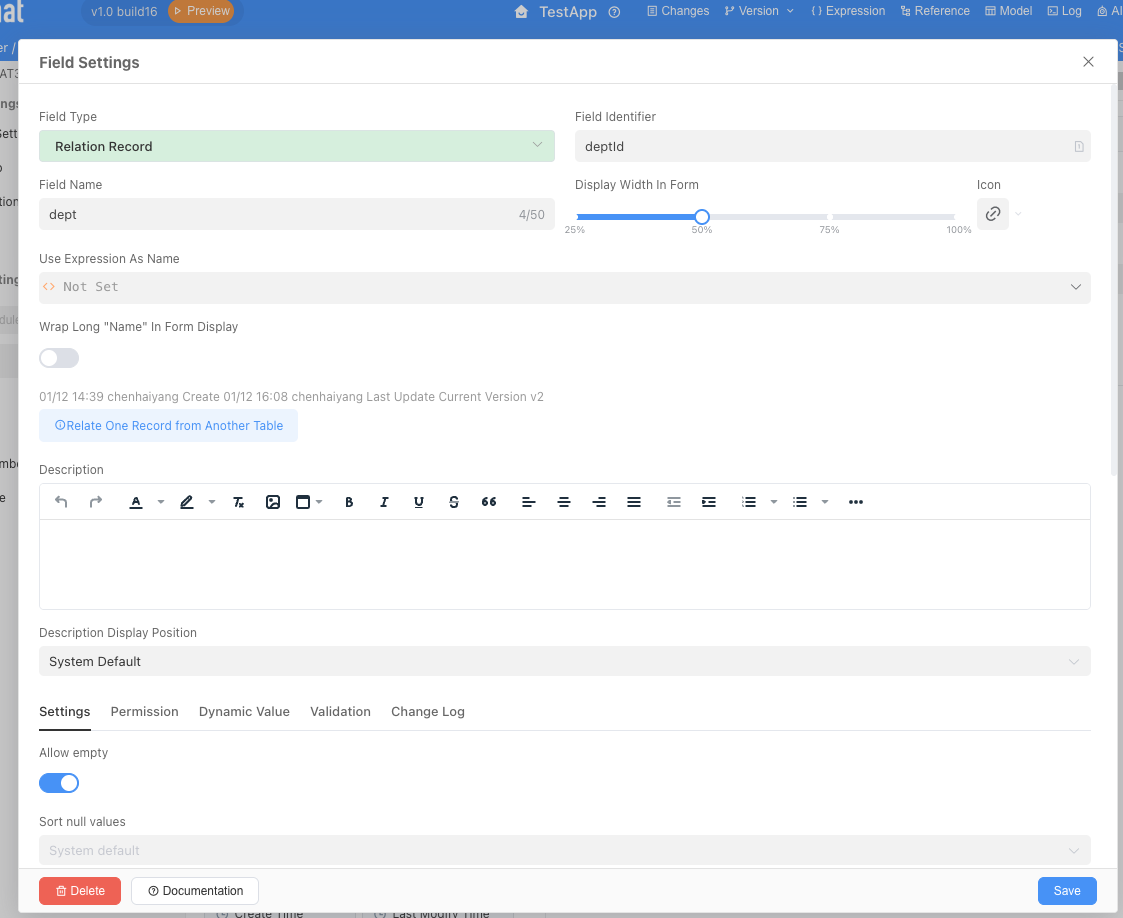
Save field: Click Save.
After completing this step, you will see a new "Department Supervisor" column in the [Employee Table] (remember to add this display field in the table settings!). Its value is automatically brought out, and you don't need to fill it in manually. When an employee's department is determined, the supervisor of that department will be automatically displayed here, ensuring data consistency.
2.6.2 Add Combined Query Conditions for [Department Supervisor] Role
Now that we have a judgment basis, we can start setting permissions for the "Department Supervisor" role.
The configuration process is exactly the same as in section 2.5.2. You only need to configure the following filter (only filter employees whose department supervisor equals their own ID):
2.6.3 Configure "Permissions" for [HR Specialist] Role
For the “HR Specialist” role, which needs to view all data, the configuration is actually the simplest.
The configuration process is the same as the previous step. Add a filter only visible to HR specialists, but here, we don't need to add any combined query conditions. An empty condition list means "unrestricted" to the system. The system will not perform any row-level data filtering on this role.
2.6.4 Verify the Effect
Now, we have set up multiple "combined query conditions" for the [Employee Table]. The system's logic for judging permissions is an "OR" relationship:
When a user accesses the [Employee Table], the system will check all condition groups corresponding to the roles he has one by one. As long as he satisfies any one of the condition group rules, he can see the data filtered by that rule.
- If he is an ordinary employee, he satisfies the rule "
Associated AccountequalsCurrent logged-in user", so he can see his own record. - If he is a department supervisor, he satisfies the rule "
Department SupervisorequalsCurrent logged-in user", so he can see all employee records in his department. - If he is an HR specialist, he has no data filtering rules, so he can see all employee records.
Verify the effect:
Publish the application to ensure all permission settings have taken effect.
Log in with [Ordinary Employee] role: Access the [Employee Table], verify that only your own record can be seen.
Log in with [Department Supervisor] role: Access the [Employee Table], verify that you can see and only see all employee records in your own department.
Log in with [HR Specialist] role: Access the [Employee Table], verify that you can see all employee records in all departments of the company.
If an employee has multiple identities as ordinary employee, HR specialist, and department supervisor, then he can see all filter conditions and can view different filtering effects by switching tabs.